rayTracing

0 主要对games101中的离线渲染做一个归纳

1 Whitted-Style Ray Tracing 只考虑折射 反射(可以多次反射、折射)

Whitted-style光线追踪算法是由Turner Whitted在1980年提出的,用于解决复杂曲面的反射折射效果。
最终每个像素的颜色(相比于blin phong 模型多了反射和折射):

fragColor = 直接光照颜色 + 反射光带来的颜色 + 折射光带来的颜色。

核心思想:利用了光路是可逆的,由浅入深主要有以下两个步骤:

1.1 step1: rayCasting

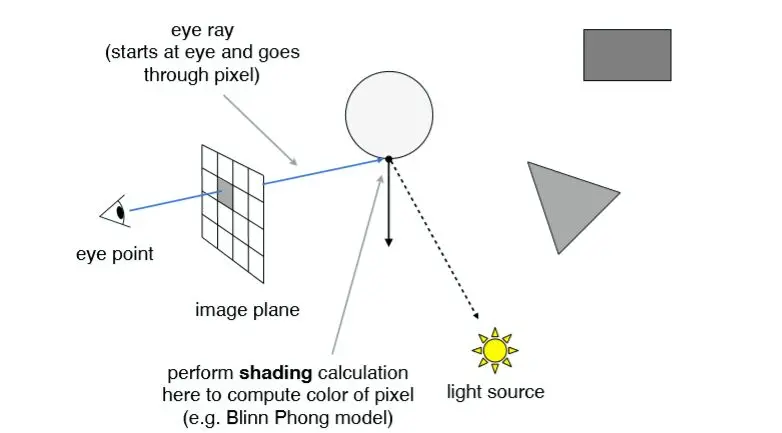
如下图:从相机作为原点出发,连接像素发射一条光线ray,假设碰撞到物体就结束(不反射,不折射3),那么直接光源照射到碰撞到物体的点,然后逆着ray到对应的像素,就得到了对应像素的颜色,这个过程我们显而易见只考虑了从物体直接射到像素的ray,并没有考虑折射和反射,所以这个第一步相当于blin phong模型
https://raw.githubusercontent.com/xychen5/blogImgs/main/imgs/Whitted-StyleRayTracing_rayCasting.5jwjx8mj4ak0.webp

1.2 step2: 考虑反射折射的rayCasting

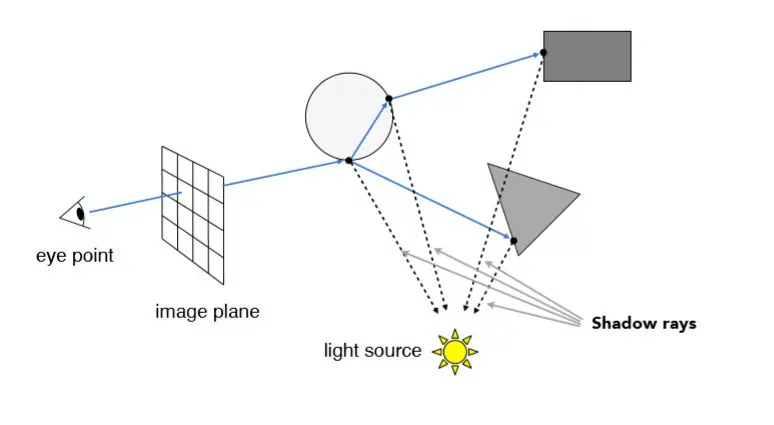
从图中清晰看到,ray照射到球体,发生了反射,折射,那么可以看到,这是折射2次,反射1次的图,那么ray对应的像素的颜色贡献有:最左边圆上的点的直射,来自三角形的点的反射,来自正方形的折射两次以后的颜色,很显然这个rayCasting过程会随着折射与反射递归,具体递归(也就是追踪过程的一些细节):

  • 1 设置最大次数,以停止
  • 2 光反射折射都是有能量损耗的,比如折射以后进入下一次递归乘以一个系数
  • 3 若没碰到物体,返回背景色即可
    https://raw.githubusercontent.com/xychen5/blogImgs/main/imgs/Whitted-StyleRayTracing.1xxchqgzstxc.webp

看看具体代码实现:

1
2
3
4
5
6
7
8
9
10
11
12
13
14
15
16
17
18
19
20
21
22
23
24
25
26
27
28
29
30
31
32
33
34
35
36
37
38
39
40
41
42
43
44
45
46
47
48
49
50
51
52
53
54
55
56
57
58
59
60
61
62
63
64
65
66
67
68
69
70
71
72
73
74
75
76
77
78
79
80
81
82
83
84
85
86
87
88
89
90
91
92
93
94
95
96
97
98
99
100
101
102
103
104
105
106
107
108
109
110
111
112
113
114
115
116
117
118
119
120
121
122
123
124
125
126
127
128
129
130
131
132
133
134
135
136
137
138
139
140
141
142
// ------------------------- 设置材质
auto sph2 = std::make_unique<Sphere>(Vector3f(0.5, -0.5, -8), 1.5);
sph2->ior = 1.5;
sph2->materialType = REFLECTION_AND_REFRACTION;
scene.Add(std::move(mesh));
scene.Add(std::make_unique<Light>(Vector3f(-20, 70, 20), 0.5));
scene.Add(std::make_unique<Light>(Vector3f(30, 50, -12), 0.5));

// ------------------------- 调用处
void Renderer::Render(const Scene& scene)
{
std::vector<Vector3f> framebuffer(scene.width * scene.height);
std::vector<Vector3f> framebuffer2(scene.width * scene.height);

float scale = std::tan(deg2rad(scene.fov * 0.5f));
float imageAspectRatio = scene.width / (float)scene.height;

// Use this variable as the eye position to start your rays.
Vector3f eye_pos(0);
int m = 0;
for (int j = 0; j < scene.height; ++j)
{
for (int i = 0; i < scene.width; ++i)
{
// generate primary ray direction
float x;
float y;
// TODO: Find the x and y positions of the current pixel to get the direction
// vector that passes through it.
// Also, don't forget to multiply both of them with the variable *scale*, and
// x (horizontal) variable with the *imageAspectRatio*
// To NDC space
x = (float)i / scene.width - 0.5;
y = (float)(scene.height - j) / scene.height - 0.5;
// To world space
x *= scale * imageAspectRatio;
y *= scale;

Vector3f dir = Vector3f(x, y, -1); // Don't forget to normalize this direction!
dir = normalize(dir);
framebuffer[m++] = castRay(eye_pos, dir, scene, 0);
}
UpdateProgress(j / (float)scene.height);
}

// save framebuffer to file
FILE* fp = fopen("binary.ppm", "wb");
(void)fprintf(fp, "P6\n%d %d\n255\n", scene.width, scene.height);
for (auto i = 0; i < scene.height * scene.width; ++i) {
static unsigned char color[3];
color[0] = (char)(255 * clamp(0, 1, framebuffer[i].x));
color[1] = (char)(255 * clamp(0, 1, framebuffer[i].y));
color[2] = (char)(255 * clamp(0, 1, framebuffer[i].z));
fwrite(color, 1, 3, fp);
}
fclose(fp);
}


// ------------------------- castRay
Vector3f castRay(
const Vector3f &orig, const Vector3f &dir, const Scene& scene,
int depth)
{
if (depth > scene.maxDepth) {
return Vector3f(0.0,0.0,0.0);
}

Vector3f hitColor = scene.backgroundColor;
if (auto payload = trace(orig, dir, scene.get_objects()); payload)
{
Vector3f hitPoint = orig + dir * payload->tNear;
Vector3f N; // normal
Vector2f st; // st coordinates
payload->hit_obj->getSurfaceProperties(hitPoint, dir, payload->index, payload->uv, N, st);
switch (payload->hit_obj->materialType) {
case REFLECTION_AND_REFRACTION:
{
Vector3f reflectionDirection = normalize(reflect(dir, N));
Vector3f refractionDirection = normalize(refract(dir, N, payload->hit_obj->ior));
Vector3f reflectionRayOrig = (dotProduct(reflectionDirection, N) < 0) ?
hitPoint - N * scene.epsilon :
hitPoint + N * scene.epsilon;
Vector3f refractionRayOrig = (dotProduct(refractionDirection, N) < 0) ?
hitPoint - N * scene.epsilon :
hitPoint + N * scene.epsilon;
Vector3f reflectionColor = castRay(reflectionRayOrig, reflectionDirection, scene, depth + 1);
Vector3f refractionColor = castRay(refractionRayOrig, refractionDirection, scene, depth + 1);
float kr = fresnel(dir, N, payload->hit_obj->ior);
hitColor = reflectionColor * kr + refractionColor * (1 - kr);
break;
}
case REFLECTION:
{
float kr = fresnel(dir, N, payload->hit_obj->ior);
Vector3f reflectionDirection = reflect(dir, N);
Vector3f reflectionRayOrig = (dotProduct(reflectionDirection, N) < 0) ?
hitPoint + N * scene.epsilon :
hitPoint - N * scene.epsilon;
hitColor = castRay(reflectionRayOrig, reflectionDirection, scene, depth + 1) * kr;
break;
}
default:
{
// [comment]
// We use the Phong illumation model int the default case. The phong model
// is composed of a diffuse and a specular reflection component.
// [/comment]
Vector3f lightAmt = 0, specularColor = 0;
Vector3f shadowPointOrig = (dotProduct(dir, N) < 0) ?
hitPoint + N * scene.epsilon :
hitPoint - N * scene.epsilon;
// [comment]
// Loop over all lights in the scene and sum their contribution up
// We also apply the lambert cosine law
// [/comment]
for (auto& light : scene.get_lights()) {
Vector3f lightDir = light->position - hitPoint;
// square of the distance between hitPoint and the light
float lightDistance2 = dotProduct(lightDir, lightDir);
lightDir = normalize(lightDir);
float LdotN = std::max(0.f, dotProduct(lightDir, N));
// is the point in shadow, and is the nearest occluding object closer to the object than the light itself?
auto shadow_res = trace(shadowPointOrig, lightDir, scene.get_objects());
bool inShadow = shadow_res && (shadow_res->tNear * shadow_res->tNear < lightDistance2);

lightAmt += inShadow ? 0 : light->intensity * LdotN;
Vector3f reflectionDirection = reflect(-lightDir, N);

specularColor += powf(std::max(0.f, -dotProduct(reflectionDirection, dir)),
payload->hit_obj->specularExponent) * light->intensity;
}

hitColor = lightAmt * payload->hit_obj->evalDiffuseColor(st) * payload->hit_obj->Kd + specularColor * payload->hit_obj->Ks;
break;
}
}
}

return hitColor;
}

2 蒙特卡洛rayTracing

2.1 回看1的whitted光线追中的问题

很显然它只考虑了折射与反射,漫反射呢?并没有考虑
漫反射是一个很复杂的问题,那么思考一下,漫反射,不就是在不光滑表面的反射版本吗?基于1如何改进一下反射呢?

1中,我们可以知道从一个像素中仅有一条ray,然后反射是镜面反射,那么现在我们考虑在反射点,将原来的一条反射,发散成为1000条,然后均匀的分布在反射点能够反射的各个方向(对于这些采样的反射反向,也就是这些个立体角),把这些反射方向上的光线的颜色进行一个加权求和(为什么不是平均求和?因为反射肯定和你入射方向相关),基本上就是这个思路。

那么考虑一下几个问题:

  • 1 什么时候停止?
    • 1.1 较为容易,采用轮盘赌思想:我们考虑每一条sample的光线继续追踪下去的概率是0.95,那么随着追踪次数变多,它越来越不可能继续追踪下去,比如20次以后,它继续下去的概率就变成了:0.95 ** 20 = 0.35
  • 2 采样的光线不会被浪费吗(很多都打不到灯)?
    • 打不到灯,那就意味着没有光从那里发出,必然是黑色的啊,那么采样的立体角就不要覆盖所有可能的漫反射方向,而是改为只对那些能够照到光源的光线进行采样

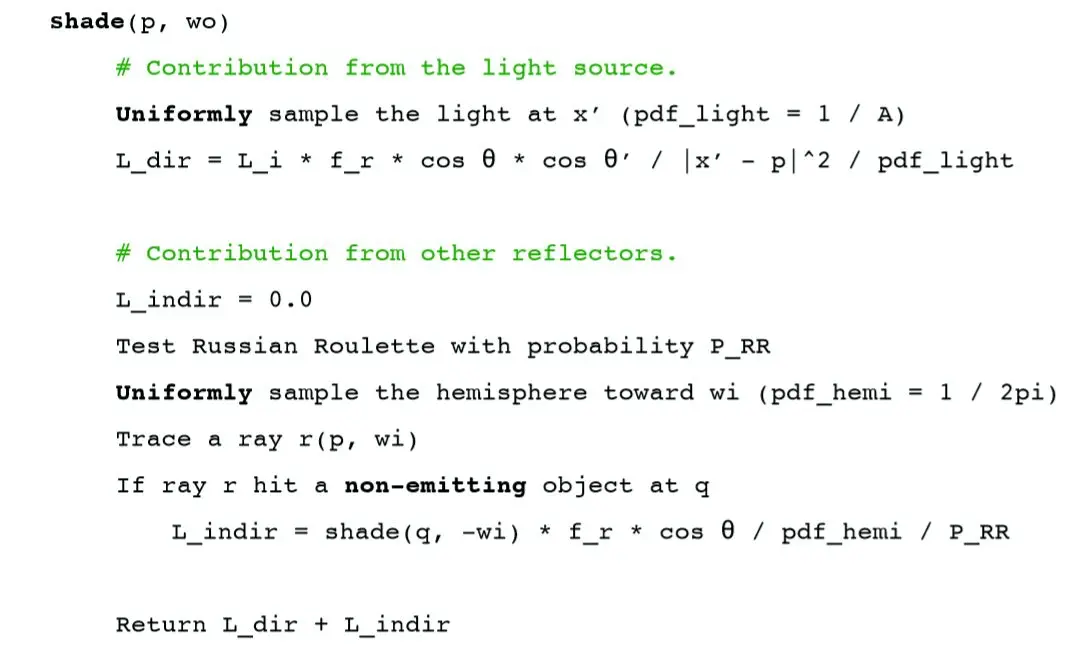
这里给一个算法伪代码:
https://raw.githubusercontent.com/xychen5/blogImgs/main/imgs/monteKalor.25382mdjlvc0.webp

接着看一下具体的实现:

1
2
3
4
5
6
7
8
9
10
11
12
13
14
15
16
17
18
19
20
21
22
23
24
25
26
27
28
29
30
31
32
33
34
35
36
37
38
39
40
41
42
43
44
45
46
47
48
49
50
51
52
53
54
55
56
57
58
59
60
61
62
63
64
65
66
67
68
69
70
71
72
73
74
75
76
77
78
79
80
81
82
83
84
85
86
87
88
89
// 对每个像素发射ray,写到framBuffer,然后最后写出文件即可
for (uint32_t j = 0; j < scene.height; ++j) {
for (uint32_t i = 0; i < scene.width; ++i) {
// generate primary ray direction
float x = (2 * (i + 0.5) / (float)scene.width - 1) *
imageAspectRatio * scale;
float y = (1 - 2 * (j + 0.5) / (float)scene.height) * scale;

Vector3f dir = normalize(Vector3f(-x, y, 1));
thread_local Vector3f color = Vector3f(0.0);
for (int k = 0; k < spp; k++){ // 每个点sample 8 次
framebuffer[m] += scene.castRay(Ray(eye_pos, dir), 0) / spp;
}
m++;
}
UpdateProgress(j/(float)scene.height);
}

// path Tracing的具体步骤:
Vector3f Scene::castRay(const Ray &ray, int depth) const
{
// TO DO Implement Path Tracing Algorithm here
Intersection intersection = intersect(ray);
Vector3f hitcolor = Vector3f(0);

//deal with light source
if(intersection.emit.norm()>0) {
// 碰到光源,这接吧hitColor置为1,则不会进入pathTracing的过程
hitcolor = Vector3f(1);
}
else if(intersection.happened)
{
// 发出的射线能够和物体相交,则进行pathTracing
Vector3f wo = normalize(-ray.direction); // 你的发射的ray的方向
Vector3f p = intersection.coords; // 获取碰撞点的世界坐标
Vector3f N = normalize(intersection.normal); // 获取碰撞点的法向

float pdf_light = 0.0f;
Intersection inter;

/*
void Scene::sampleLight(Intersection &pos, float &pdf) const
{
float emit_area_sum = 0;
for (uint32_t k = 0; k < objects.size(); ++k) {
if (objects[k]->hasEmit()){
emit_area_sum += objects[k]->getArea();
}
} // 获取所有发射光的区域
float p = get_random_float() * emit_area_sum;
emit_area_sum = 0;
for (uint32_t k = 0; k < objects.size(); ++k) {
if (objects[k]->hasEmit()){
emit_area_sum += objects[k]->getArea();
if (p <= emit_area_sum){
objects[k]->Sample(pos, pdf);
break;
}
}
}
}
*/
sampleLight(inter,pdf_light); // 上面注释给出了,是如何sampleLight的
Vector3f x = inter.coords; // 对发光体sample得到的坐标
Vector3f ws = normalize(x-p); // 从碰撞点指向发光体
Vector3f NN = normalize(inter.normal); // 发光体的法向

Vector3f L_dir = Vector3f(0);
//direct light, pdf_light = 1 / A,A是光源面积,这里就是直接对光源面积进行颜色的积分
if((intersect(Ray(p,ws)).coords - x).norm() < 0.01)
{
L_dir = inter.emit * intersection.m->eval(wo,ws,N)*dotProduct(ws,N) * dotProduct(-ws,NN) / (((x-p).norm()* (x-p).norm()) * pdf_light);
}

Vector3f L_indir = Vector3f(0);
float P_RR = get_random_float();
//indirect light
if(P_RR < Scene::RussianRoulette) // 继续追踪的可能性指数级下跌
{
Vector3f wi = intersection.m->sample(wo,N); // wi, 采样的方向,随机带来的均匀
L_indir = castRay(Ray(p,wi),depth) *intersection.m->eval(wi,wo,N) * dotProduct(wi,N) / (intersection.m->pdf(wi,wo,N)*Scene::RussianRoulette); // 对立体角进行积分,pdf函数返回是
}
hitcolor = L_indir + L_dir;
}

// 不能和物体相交的,直接return (0,0,0)
return hitcolor;
}

简单贴结果:
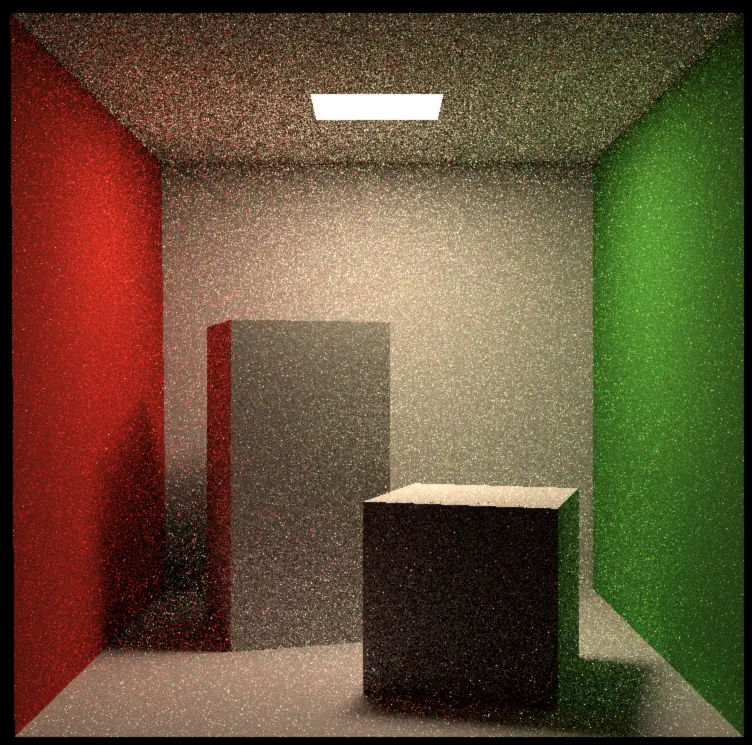
图像目标设置为768768,然后每个像素sample32次(蒙特卡罗的经典方式),每次光线进入到下一层的概率为0.25,那么平均castray会被计算多少次呢?32 * (10.25 + 2 * 0.125 + 3 0.0625 + …) 大概就是0.7532 = 24次,也就76876824的castRay的计算,花费的时间大概为23min,效果为:

spp32_768x768_possiblity0
很显然这样子的计算速度在实时渲染里是太慢了,而且噪声依然很明显,于是我们考虑新的办法

3 Ref