编译colmap

1 前期准备

1 github上下载colmap稳定版源码:

https://github.com/colmap/colmap/archive/refs/tags/3.6.zip
之后解压进入,执行: git init

2 确保编译环境

  • 1 确保你的vs不是vs2019 16.9.3以及以上,否则会有奇怪的cuda错误, 解决方案是:
  • 2 如果本篇博客所有内容都详细读完,任然无法成功编译colmap,那就装VS2015,然后用他的生成工具(cmake -G 参数指定编译器版本,命令行里输入cmake -G),项目打开还是可以用vs2019的。

然后将编译器加入环境变量:
C:\Program Files (x86)\Microsoft Visual Studio\2019\Community\VC\Tools\MSVC\14.16.27023\bin\HostX64\x64
输入cl能看到输出即可.

2 依赖安装

2.1 boost 直接安装(推荐下载vs2015版本,我用的是v_1_73)

https://boostorg.jfrog.io/artifactory/main/release/1.64.0/binaries/

1
2
3
4
5
6
7
8
9
10
boost使用源码编译的静态方式编译:
```sh
.\b2.exe --toolset=msvc-14.2 `
--address-model=64 `
--architecture=x86 `
--threading=multi `
-sZLIB_SOURCE="F:\BASE_ENV\forOpenMVS\zlib-1.2.11" -sZLIB_INCLUDE="F:\BASE_ENV\forOpenMVS\zlib-1.2.11" `
--with-iostreams --with-iostreams --with-log --with-program_options --with-graph --with-test --with-regex --with-filesystem `
--link=static --runtime-link=shared --build-type=complete `
stage --stagedir="F:\BASE_ENV\forOpenMVS\boost_1_66_0\msvc142_linkStatic_runShared" `

2.2 安装GMP和MFPR

  • 0 不想要自己折腾: 参考: https://github.com/emphasis87/libmpfr-msys2-mingw64,这里面应该有现成的库。

  • 1 安装Cygwin

    1
    2
    3
    4
    5
    6
    7
    8
    9
    10
    11
    12
    Setup Environment
    Install Cygwin, add the following packages to the default installation:

    gcc-core
    gcc-g++
    libgcc
    m4
    make #不知为何安装后在Cygwin根目录下搜不到make程序,见下面步骤2安装make
    cmake
    bash
    Add the following Environment Variable to the User PATH: C:\Program Files (x86)\Microsoft Visual Studio\2017\Enterprise\VC\Tools\MSVC\14.15.26726\bin\Hostx64\x64
    This is so you can use the lib command. Your lib.exe may be located elsewhere.

    安装好Cygwin以及一些依赖以后,在其根目录(方便说明记为: CygwinRoot=”D:\CygwinRooto”)下的bin/minnty.exe是其终端入口,然后每次打开该终端,进入的是:$CygwinRoot/home/$(userName), 运行”cd /“后就可以理解了;

  • 2 下载并安装make

    • 2.1 从如下网址下载make的源码,https://ftp.gnu.org/gnu/make/,然后解压
    • 2.2 打开Cygwin64 Terminal命令行,进入源码根目录,然后运行:configure && ./build.sh
    • 2.3 编译得到了make.exe后将其移动到Cygwin的bin目录下
  • 3 编译gmp
    运行两个: ./configure 和 make install

    1
    2
    3
    4
    5
    6
    7
    8
    9
    10
    ./configure --prefix=/home/chenxy/mylibs/newTry/gmp-6.2.0/build/static --enable-static --disable-shared
    configure: summary of build options:

    Version: GNU MP 6.2.0
    Host type: skylake-pc-cygwin
    ABI: 64
    Install prefix: /home/chenxy/mylibs/newTry/gmp-6.2.0/build/static
    Compiler: gcc
    Static libraries: yes
    Shared libraries: no

    编译结果(默认生成的是static的数据):

    1
    2
    3
    4
    5
    6
    7
    @nash-5 ~/mylibs/gmp-6.2.0
    $ ls /usr/local/include/
    gmp.h

    @nash-5 ~/mylibs/gmp-6.2.0
    $ ls /usr/local/lib/
    libgmp.a libgmp.la pkgconfig

    生成动态连接库(注意: 动态连接库和静态连接库的.h文件不同,所以注意分成2个文件夹,至少对于gmp是如此):

    1
    ./configure --prefix=/home/chenxy/mylibs/gmp-6.2.0/build/shared --enable-shared --disable-static
  • 4 编译mfpr(需要gmp的依赖,而且是动态连接库)
    进入mfpr的根目录:
    运行./configure:

    1
    2
    checking for gmp.h... no
    configure: error: gmp.h can't be found, or is unusable.

    运行./configure –help

    1
    2
    3
    4
    ···
    --with-gmp-include=DIR GMP include directory
    --with-gmp-lib=DIR GMP lib directory
    ···

    所以:

    1
    2
    3
    4
    5
    6
    ./configure --prefix=/home/chenxy/mylibs/newTry/mpfr-4.1.0/build/static \
    --enable-static --disable-shared \
    --with-gmp-include=/home/chenxy/mylibs/newTry/gmp-6.2.0/build/static/include \
    --with-gmp-lib=/home/chenxy/mylibs/newTry/gmp-6.2.0/build/staic/lib

    make install
    1
    2
    3
    4
    ./configure --prefix=/home/chenxy/mylibs/mpfr-4.1.0/build/static \
    --with-gmp-include=/home/chenxy/mylibs/gmp-6.2.0/build/static/include \
    --with-gmp-lib=/home/chenxy/mylibs/gmp-6.2.0/build/static/lib \
    --enable-static --disable-shared

2.3 其他依赖build.py会帮你下载编译

确保你能够流畅访问github,否则需要你自己下载然后修改build.py。

3 编译colmap

3.1 对编译文件和某些源文件的修改如下:

1
2
3
4
5
6
7
8
9
10
11
12
13
14
15
16
17
18
19
20
21
22
23
24
25
26
27
28
29
30
31
32
33
34
35
36
37
38
39
40
41
42
43
44
45
46
47
48
49
50
51
52
53
54
55
56
57
58
59
60
61
62
63
64
65
66
67
68
69
70
71
72
73
74
75
76
77
78
79
80
81
82
83
84
85
86
87
88
89
90
91
92
93
94
95
96
97
98
99
100
101
102
103
104
105
106
diff --git a/CMakeLists.txt b/CMakeLists.txt
index 7333a04..d73a6ad 100755
--- a/CMakeLists.txt
+++ b/CMakeLists.txt
@@ -72,8 +72,10 @@ endif()

if(BOOST_STATIC)
set(Boost_USE_STATIC_LIBS ON)
+ # message("@@@@@@@@@@@@@@@@@@@@@@@@@@@@@@@@@@@@@@@ using static boost", ${BOOST_STATIC})
else()
add_definitions("-DBOOST_TEST_DYN_LINK")
+ # message("@@@@@@@@@@@@@@@@@@@@@@@@@@@@@@@@@@@@@@@ using dll boost", ${BOOST_STATIC})
endif()

################################################################################
@@ -86,6 +88,7 @@ endif()

find_package(Ceres REQUIRED)

+set(Boost_DEBUG ON)
find_package(Boost REQUIRED COMPONENTS
program_options
filesystem
diff --git a/scripts/python/build.py b/scripts/python/build.py
index 89dff59..fe1e4c4 100644
--- a/scripts/python/build.py
+++ b/scripts/python/build.py
@@ -75,10 +75,12 @@ def parse_args():
help="The path to the folder containing Boost, "
"e.g., under Windows: "
"C:/local/boost_1_64_0/lib64-msvc-12.0")
+ parser.add_argument("--boost_include_dir", default="F:/BASE_ENV/forOpenMVS/boost_1_73_0_v140")
+ parser.add_argument("--boost_lib_dir", default="F:/BASE_ENV/forOpenMVS/boost_1_73_0_v140/lib64-msvc-14.0")
parser.add_argument("--cgal_path", default="",
help="The path to the folder containing CGAL, "
"e.g., under Windows: C:/dev/CGAL-4.11.2/build")
- parser.add_argument("--cuda_path", default="",
+ parser.add_argument("--cuda_path", default="C:/Program Files/NVIDIA GPU Computing Toolkit/CUDA/v10.2",
help="The path to the folder containing CUDA, "
"e.g., under Windows: C:/Program Files/NVIDIA GPU "
"Computing Toolkit/CUDA/v8.0")
@@ -108,7 +110,7 @@ def parse_args():
help="Whether to build unit tests")
parser.add_argument("--build_type", default="Release",
help="Build type, e.g., Debug, Release, RelWithDebInfo")
- parser.add_argument("--cmake_generator", default="",
+ parser.add_argument("--cmake_generator", default="Visual Studio 14",
help="CMake generator, e.g., Visual Studio 14")
parser.add_argument("--no_ssl_verification",
dest="ssl_verification", action="store_false",
@@ -429,8 +431,28 @@ def build_colmap(args):
extra_config_args.append(
"-DBOOST_ROOT={}".format(args.boost_path))
extra_config_args.append(
- "-DBOOST_LIBRARYDIR={}".format(args.boost_path))
-
+ "-DBOOST_INCLUDEDIR={}".format(args.boost_include_dir))
+ extra_config_args.append(
+ "-DBOOST_LIBRARYDIR={}".format(args.boost_lib_dir))
+ # print("BOOOOOOOOOOOOOOOOOOOOOOOOOOOOOOOST: ", extra_config_args)
+ # extra_config_args.append("-DBOOST_STATIC=ON")
+ # extra_config_args.append("-DBoost_USE_STATIC_LIBS=ON")
+ # extra_config_args.append("-DBoost_USE_MULTITHREADED=ON")
+ # extra_config_args.append("-DBoost_USE_STATIC_RUNTIME=ON")
+ # extra_config_args.append("-DBOOST_ALL_DYN_LINK=ON")
+
+ # -DGMP_INCLUDE_DIR="F:\BASE_ENV\forOpenMVS\gmp_mpfr\include" `
+ # -DGMP_LIBRARIES="F:\BASE_ENV\forOpenMVS\gmp_mpfr\lib\libgmp-10.lib" `
+ # -DMPFR_INCLUDE_DIR="F:\BASE_ENV\forOpenMVS\gmp_mpfr\include" `
+ # -DMPFR_LIBRARIES="F:\BASE_ENV\forOpenMVS\gmp_mpfr\lib\libmpfr-4.lib"
+ extra_config_args.append(
+ "-DGMP_INCLUDE_DIR={}".format("F:/BASE_ENV/forOpenMVS/gmp_mpfr/include"))
+ extra_config_args.append(
+ "-DGMP_LIBRARIES={}".format("F:/BASE_ENV/forOpenMVS/gmp_mpfr/lib/libgmp-10.lib"))
+ extra_config_args.append(
+ "-DMPFR_INCLUDE_DIR={}".format("F:/BASE_ENV/forOpenMVS/gmp_mpfr/include"))
+ extra_config_args.append(
+ "-DMPFR_LIBRARIES={}".format("F:/BASE_ENV/forOpenMVS/gmp_mpfr/lib/libmpfr-4.lib"))
if args.cuda_path != "":
extra_config_args.append(
"-DCUDA_TOOLKIT_ROOT_DIR={}".format(args.cuda_path))
@@ -479,6 +501,8 @@ def build_post_process(args):
os.path.basename(lapack_path)))

if args.qt_path:
+ print("copying !!!!!!!!!!!!!!!!!!!!!!!!!!!!!!!!!!!!!!!!", os.path.join(args.qt_path, "bin/Qt5Core.dll"))
+ print("copying !!!!!!!!!!!!!!!!!!!!!!!!!!!!!!!!!!!!!!!!", os.path.join(args.install_path, "lib/Qt5Core.dll"))
copy_file_if_not_exists(
os.path.join(args.qt_path, "bin/Qt5Core.dll"),
os.path.join(args.install_path, "lib/Qt5Core.dll"))
diff --git a/src/retrieval/utils.h b/src/retrieval/utils.h
index b99bf64..d773220 100644
--- a/src/retrieval/utils.h
+++ b/src/retrieval/utils.h
@@ -52,7 +52,8 @@ struct ImageScore {
template <int N, int kSigma = 16>
class HammingDistWeightFunctor {
public:
- static const size_t kMaxHammingDistance = static_cast<size_t>(1.5f * kSigma);
+ // static const size_t kMaxHammingDistance = static_cast<size_t>(1.5f * kSigma);
+ static const size_t kMaxHammingDistance = 24;

HammingDistWeightFunctor() {
// Fills the look-up table.

(END)

3.2 编辑CmakeList.txt

set(Boost_DEBUG ON),打开boost的调试信息,boost的链接最容易出问题。(以下的内容仅供了解,无需修改)

主要注意: -DBoost_USE_STATIC_RUNTIME=ON 这个设置是指boost的库在使用cpp的runtime时候将会使用静态库,如果这个选项打开了,则需要往CmakeList.txt(colmap的根目录)中添加:

1
2
3
# set the used type of runtime lib to be static
set(CMAKE_CXX_FLAGS_RELEASE "/MT")
set(CMAKE_CXX_FLAGS_DEBUG "/MTd")

上面意味着运行时库调用时选择静态运行时库(vs中,在项目->cpp->代码生成中有MT/MD的配置), 而且对应的编译出来的boost库,编译时需要带上: –link=static –runtime-link=static –build-type=complete 参数;

3.3 编译执行:

注意我们使用静态的boost避免boost 的链接错误;

1
2
3
4
5
6
7
8
9
10
11
12
python scripts/python/build.py \
--build_path "F:/prjs/colmap-3.6/build" \
--colmap_path "F:/prjs/colmap-3.6" \
--boost_path "F:/BASE_ENV/forOpenMVS/boost_1_73_0_v140" \
--boost_include_dir "F:/BASE_ENV/forOpenMVS/boost_1_73_0_v140" \
--boost_lib_dir "F:/BASE_ENV/forOpenMVS/boost_1_73_0_v140\lib64-msvc-14.0" \
--qt_path "F:/BASE_ENV/forOpenMVS/qt_msvc2015_64/msvc2015_64" \
--cgal_path "F:/BASE_ENV/forOpenMVS/CGAL-5.1/build" \
--cmake_generator "Visual Studio 14" \
--with_cuda \
--cuda_path "C:/Program Files/NVIDIA GPU Computing Toolkit/CUDA/v10.2" \

上述命令会失败,但是没关系,用code打开F:/prjs/colmap-3.6/build/colmap/__build__:
全局替换的方式删除: BOOST_ALL_DYN_LINK=1,
然后在F:/prjs/colmap-3.6/build/colmap/__build__里找到COLMAP.sln,然后手动用vs打开然后编译;
推荐使用VS2015的工具对colmap进行编译.

4 给出我编译后的库目录结构(最重要的是__install__/lib下面的内容):

其中: install/lib下面的platform中必须要有qwindows.dll,参考问题4。
然后: install/lib里面的cgal*.dll也是不必须的,因为本博客使用的cgal是5.x,5.x的cgal都是header only 的库,所以该dll可以没有,但是其他的dll像是libgmp-10.dll确是必要的,否则将无法运行。

1
2
3
4
5
6
7
8
9
10
11
12
13
14
15
16
17
18
19
20
21
22
23
24
25
26
27
28
29
30
31
32
33
34
35
36
37
38
39
40
41
42
43
44
45
46
47
48
49
50
51
52
53
54
55
56
57
58
59
60
61
62
63
64
65
66
67
68
69
70
71
72
73
74
75
76
77
78
79
80
81
82
83
84
85
86
87
88
89
90
91
92
sagar@DESKTOP-QM75KNS MINGW64 /f/prjs/colmap-3.6/build
$ ls
__download__ ceres-solver colmap freeimage glew suite-sparse
__install__ CGAL-vc140-mt-4.14.3.dll eigen gflags glog
sagar@DESKTOP-QM75KNS MINGW64 /f/prjs/colmap-3.6/build
$ ls __download__/
ceres-solver-1.14.0.zip freeimage-3.18.0.zip glew-2.1.0.zip suite-sparse.zip
eigen-3.3.7.zip gflags-2.2.2.zip glog-0.3.5.zip
sagar@DESKTOP-QM75KNS MINGW64 /f/prjs/colmap-3.6/build
$ ls
__download__ ceres-solver colmap freeimage glew suite-sparse
__install__ CGAL-vc140-mt-4.14.3.dll eigen gflags glog

sagar@DESKTOP-QM75KNS MINGW64 /f/prjs/colmap-3.6/build
$ cd __install__/lib

sagar@DESKTOP-QM75KNS MINGW64 /f/prjs/colmap-3.6/build/__install__/lib
$ tree
.
├── FreeImage.dll
├── FreeImage.lib
├── Qt5Core.dll
├── Qt5Gui.dll
├── Qt5Widgets.dll
├── ceres.lib
├── cmake
│   ├── gflags
│   │   ├── gflags-config-version.cmake
│   │   ├── gflags-config.cmake
│   │   ├── gflags-nonamespace-targets-release.cmake
│   │   ├── gflags-nonamespace-targets.cmake
│   │   ├── gflags-targets-release.cmake
│   │   └── gflags-targets.cmake
│   ├── glew
│   │   ├── CopyImportedTargetProperties.cmake
│   │   ├── glew-config.cmake
│   │   ├── glew-targets-release.cmake
│   │   └── glew-targets.cmake
│   ├── glog
│   │   ├── glog-config-version.cmake
│   │   ├── glog-config.cmake
│   │   ├── glog-targets-release.cmake
│   │   └── glog-targets.cmake
│   └── suitesparse-4.5.0
│   ├── SuiteSparse-targets-release.cmake
│   ├── SuiteSparse-targets.cmake
│   ├── suitesparse-config-version.cmake
│   └── suitesparse-config.cmake
├── colmap
│   ├── colmap.lib
│   ├── colmap_cuda.lib
│   ├── flann.lib
│   ├── graclus.lib
│   ├── lsd.lib
│   ├── pba.lib
│   ├── poisson_recon.lib
│   ├── sift_gpu.lib
│   ├── sqlite3.lib
│   └── vlfeat.lib
├── cudart64_102.dll
├── gflags_nothreads_static.lib
├── gflags_static.lib
├── glew32.dll
├── glew32.lib
├── glog.lib
├── libamd.lib
├── libblas.dll
├── libbtf.lib
├── libcamd.lib
├── libccolamd.lib
├── libcholmod.lib
├── libcolamd.lib
├── libcxsparse.lib
├── libgcc_s_sjlj-1.dll
├── libgfortran-3.dll
├── libglew32.lib
├── libgmp-10.dll
├── libklu.lib
├── liblapack.dll
├── libldl.lib
├── libquadmath-0.dll
├── libspqr.lib
├── libumfpack.lib
├── metis.lib
├── pkgconfig
│   └── glew.pc
├── platforms
│   └── qwindows.dll
└── suitesparseconfig.lib

8 directories, 62 files

5 可能遇到的问题:

  • Q 1 一切都能正常编译通过,但是出现“程序无法正常启动, 0xc000007b”
  • 解决方案: 仔细核对我提供的目录,看看是否是dll少了,一般libgmp-10.dll少了就会报这个错误,可以参照问题4
  • Q 2 boost总是报link2005的重定义错误:
  • 解决方案: 打开colmap.sln,你会发现: 项目->属性c++预处理(宏定义) 中多了BOOST_ALL_DYN_LINK=1,用如下方法全局删除即可:用code打开F:/prjs/colmap-3.6/build/colmap/__build__:
    全局替换的方式删除: BOOST_ALL_DYN_LINK=1,然后vs会让你重载项目配置,再次编译应该可以直接通过。造成的原因可能是boost总是默认enable了autolink,这导致你必须把你的boost库的版本和你的vs版本对上,而且可能默认是全部动态链接(即使你配置了静态链接以后),可能的解决方案是,在项目根目录下面的CMAKELIST.txt中添加:
  • Q 3 libcpmt.lib(ppltasks.obj) : error LNK2001: 无法解析的外部符号 __CxxFrameHandler4报错:
  • 解决方案: 是因为你的库用的是vs2019编译的,然后colmap又用vs2015编译,就会报这个错误。
  • Q 4 Qt platform plugin ‘windows’ not found
  • 解决方案: 是因为你虽然安装了qt,但是没有复制相关的dll到./build/colmap/install/lib下(colmap的运行直接双击__install__/COLMAP.BAT即可),复制方案:(也就是build.py中的编译后处理部分做的事情)
    1
    2
    3
    4
    5
    6
    7
    8
    9
    10
    11
    12
    13
    14
    15
    16
    17
    18
    19
    20
    21
    22
    23
    24
    25
    26
    27
    28
    29
    30
    31
    32
    33
    34
    35
    36
    37
    38
    39
    40
    41
    42
    43
    44
    45
    46
    47
    48
    49
    def build_post_process(args):
    if PLATFORM_IS_WINDOWS:
    lapack_paths = glob.glob(
    os.path.join(args.install_path, "lib64/lapack_blas_windows/*.dll"))
    if lapack_paths:
    for lapack_path in lapack_paths:
    copy_file_if_not_exists(
    lapack_path,
    os.path.join(
    args.install_path, "lib",
    os.path.basename(lapack_path)))

    if args.qt_path:
    copy_file_if_not_exists(
    os.path.join(args.qt_path, "bin/Qt5Core.dll"),
    os.path.join(args.install_path, "lib/Qt5Core.dll"))
    copy_file_if_not_exists(
    os.path.join(args.qt_path, "bin/Qt5Gui.dll"),
    os.path.join(args.install_path, "lib/Qt5Gui.dll"))
    copy_file_if_not_exists(
    os.path.join(args.qt_path, "bin/Qt5Widgets.dll"),
    os.path.join(args.install_path, "lib/Qt5Widgets.dll"))
    mkdir_if_not_exists(
    os.path.join(args.install_path, "lib/platforms"))
    copy_file_if_not_exists(
    os.path.join(args.qt_path, "plugins/platforms/qwindows.dll"),
    os.path.join(args.install_path, "lib/platforms/qwindows.dll"))

    if args.with_cuda and args.cuda_path:
    cudart_lib_path = glob.glob(os.path.join(args.cuda_path,
    "bin/cudart64_*.dll"))[0]
    copy_file_if_not_exists(
    cudart_lib_path,
    os.path.join(args.install_path, "lib",
    os.path.basename(cudart_lib_path)))

    if args.cgal_path:
    gmp_lib_path = os.path.join(
    args.cgal_path, "auxiliary/gmp/lib/libgmp-10.dll")
    if os.path.exists(gmp_lib_path):
    copy_file_if_not_exists(
    gmp_lib_path,
    os.path.join(args.install_path, "lib/libgmp-10.dll"))
    cgal_lib_path = glob.glob(os.path.join(
    args.cgal_path, "bin/CGAL-vc*-mt-*.dll"))
    copy_file_if_not_exists(
    cgal_lib_path[0],
    os.path.join(args.install_path, "lib",
    os.path.basename(cgal_lib_path[0])))
  • Q 5 莫名其妙报了cuda的编译的错误:error : identifier “__floorf” is undefined in device code
  • 解决方案: vs2019 16.9.3以及以上有这个问题,你需要卸载然后回退到16.8.5
  • Q 6 C2132 编译器错误:表达式的计算结果不是常数
  • 解决方案: 可能是你的编译器对cpp的新特性支持的不够好?,修改 src/retrieval/utils.h 的 55行为:
    1
    2
    // static const size_t kMaxHammingDistance = static_cast<size_t>(1.5f * kSigma);
    static const size_t kMaxHammingDistance = static_cast<size_t>(24);
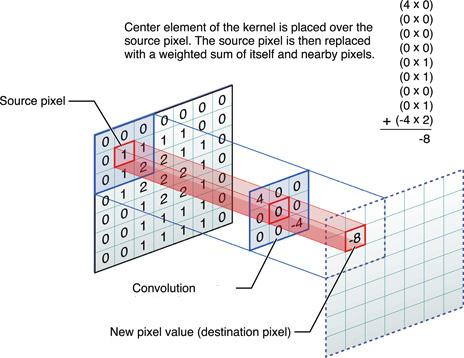
convolution operation on an image:

主要的卷积操作可以参考:
https://en.wikipedia.org/wiki/Kernel_(image_processing)
卷积的实际运算公式如下: $\displaystyle g(x,y)=\omega *f(x,y)=\sum _{dx=-a}^{a}{\sum _{dy=-b}^{b}{\omega (dx,dy)f(x+dx,y+dy)}}$

比较生动的图像如下:

卷积操作

高斯模糊

主要会生成一个高斯卷积核:with σ = 0.84089642, 一个7x7的kernel如下:
$$
\begin{matrix}
0.00000067 & 0.00002292 & \bold0.00019117 & 0.00038771 & \bold0.00019117 & 0.00002292 & 0.00000067 \
0.00002292 & 0.00078633 & 0.00655965 & 0.01330373 & 0.00655965 & 0.00078633 & 0.00002292 \
\bold0.00019117 & 0.00655965 & 0.05472157 & 0.11098164 & 0.05472157 & 0.00655965 & \bold0.00019117 \
0.00038771 & 0.01330373 & 0.11098164 & \bold0.22508352 & 0.11098164 & 0.01330373 & 0.00038771 \
\bold0.00019117 & 0.00655965 & 0.05472157 & 0.11098164 & 0.05472157 & 0.00655965 & \bold0.00019117 \
0.00002292 & 0.00078633 & 0.00655965 & 0.01330373 & 0.00655965 & 0.00078633 & 0.00002292 \
0.00000067 & 0.00002292 & \bold0.00019117 & 0.00038771 & \bold0.00019117 & 0.00002292 & 0.00000067
\end{matrix}
$$

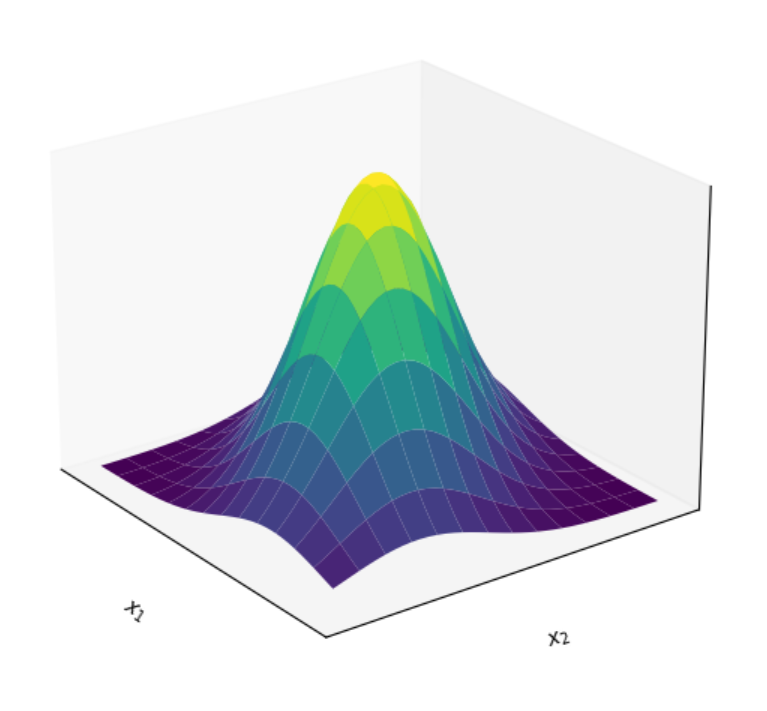
1个2d 正太分布的概率图:

二维高斯分布

高斯模糊的原理的理解:
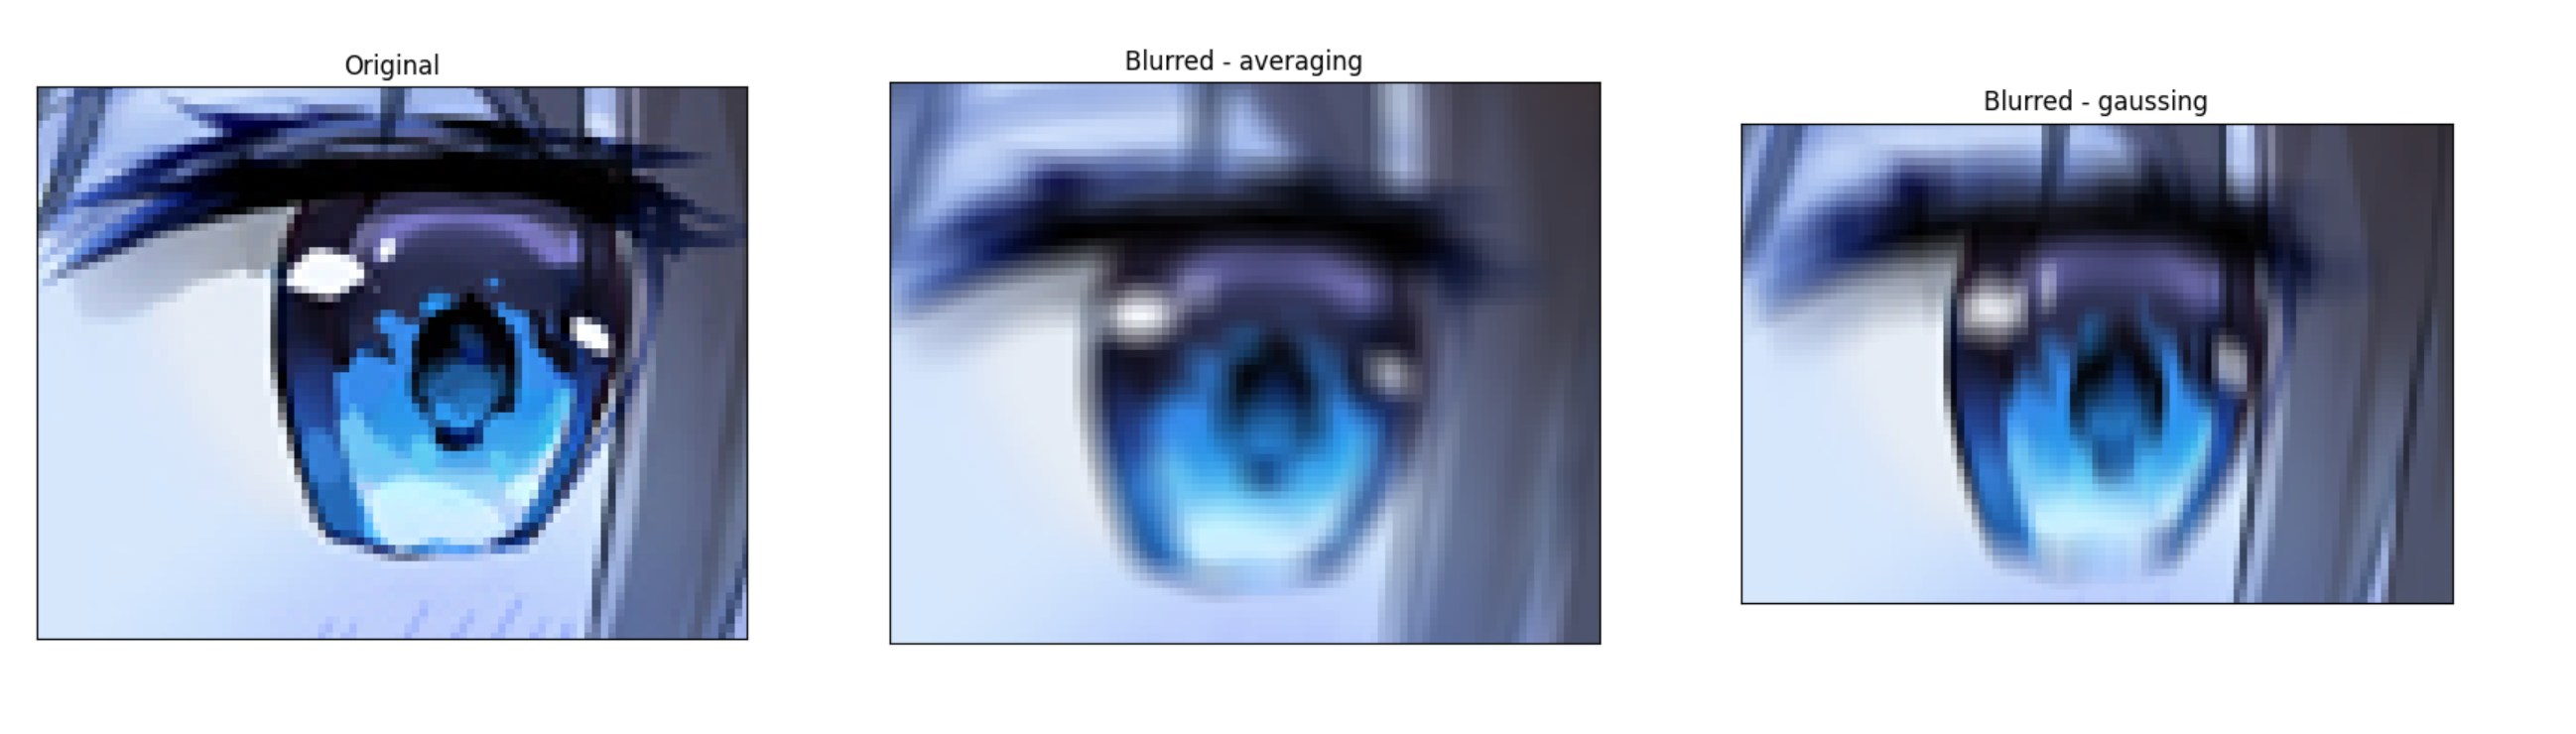
对图像中的每一个像素做卷积(先乘后和)后,可以起到模糊的作用,主要原因是,高斯核中间位置的权重高(这也就是正太分布的性质),然后边缘的权重低,所以做完卷积获得的每一个新的像素都是其原来对应位置的像素和其周边的像素的加权和,能产生模糊感来自于周围像素的权重,能保证图像还有原来的样子是因为中间权重最大。如上的高斯核,可以清楚的看到高斯核最中心的概率是最大的。
均值模糊与高斯模糊

lap锐化:

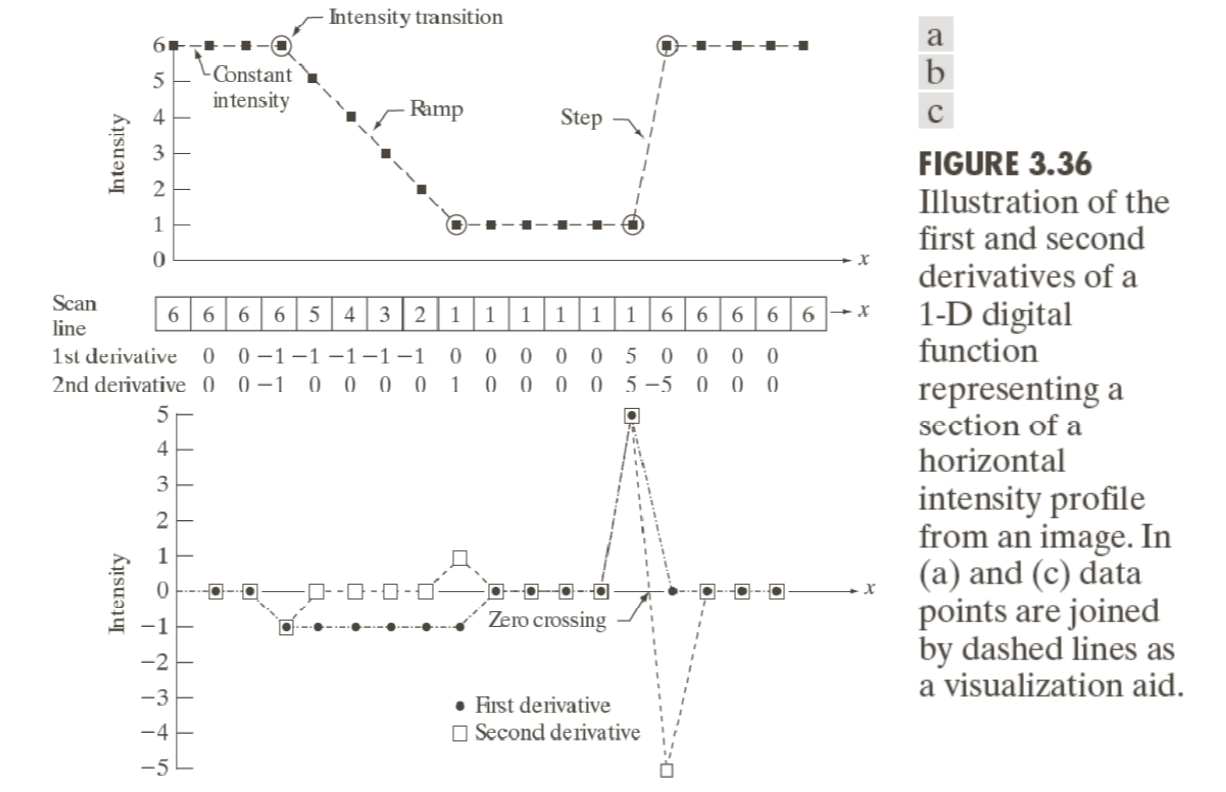
首先看一个图:
一阶导与二阶导变化

我们主要看下面的部分,first derivative和second derivative的折线对比,可以看到:
在ramp过程中,我们可以理解为朝着x方向,某种颜色从高过度到低,然后一阶导的反应就是这个过度的过程中的值都是一样的,所以这不利于探测出这样颜色持续变化的边界,于是使用2阶导,我们利用1阶导和2阶导的对比来验证这一点,可以得出之前一阶导2阶导对比里面1阶导用的核为:
$$
{\frac {\partial f}{\partial x}} = f(x+1) - f(x)

\Longrightarrow

\left {
\begin{matrix}
0 & 0 & 0 \
0 & 2 & -1 \
0 & -1 & 0
\end{matrix}
\right }
$$
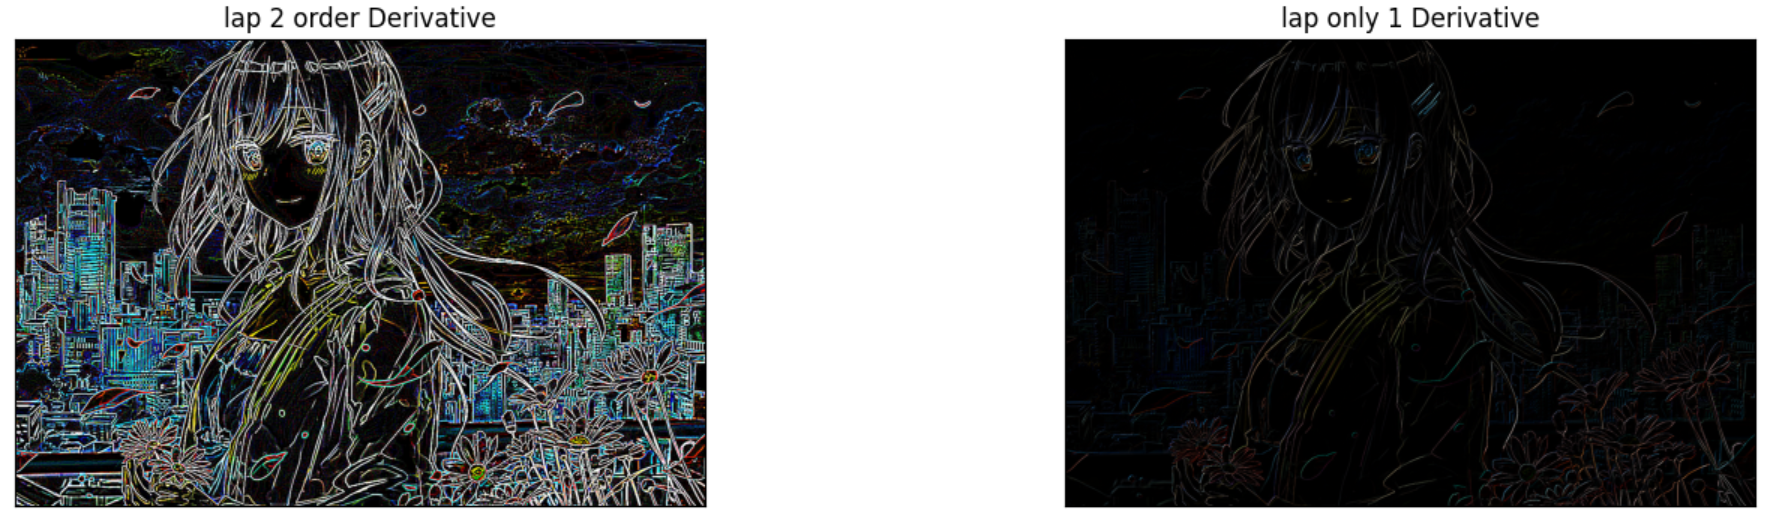
下图中,左侧为2阶,右侧为1阶,可以看出2阶能够更好反应边界;
一阶导与二阶导对比

2阶导求解过程: (实际也就是分别对x,y做2阶偏导求和), $\nabla f={\frac {\partial ^{2}f}{\partial x^{2}}}+{\frac {\partial ^{2}f}{\partial y^{2}}}$ ,对于离散的图片,其离散的二阶导应该为对x,和y分别求2阶导然后求和:
$$

\left {
\begin{aligned}
{\frac{\partial ^{2}f}{\partial ^{2}x}} = f(x+1, y) + f(x-1, y) - 2f(x,y) \
{\frac{\partial ^{2}f}{\partial ^{2}y}} = f(x, y+1) + f(x, y-1) - 2f(x,y)
\end{aligned}
\right.

\Longrightarrow

\nabla f={\frac {\partial ^{2}f}{\partial x^{2}}}+{\frac {\partial ^{2}f}{\partial y^{2}}} = f(x+1, y) + f(x-1, y) + f(x, y+1) + f(x, y-1) - 4f(x,y)
$$

于是可以得到,上述2阶导对应核为:
$$
\begin{matrix}
0 & -1 & 0 \
-1 & 4 & -1 \
0 & -1 & 0 \
\end{matrix}
$$

总的对比图:
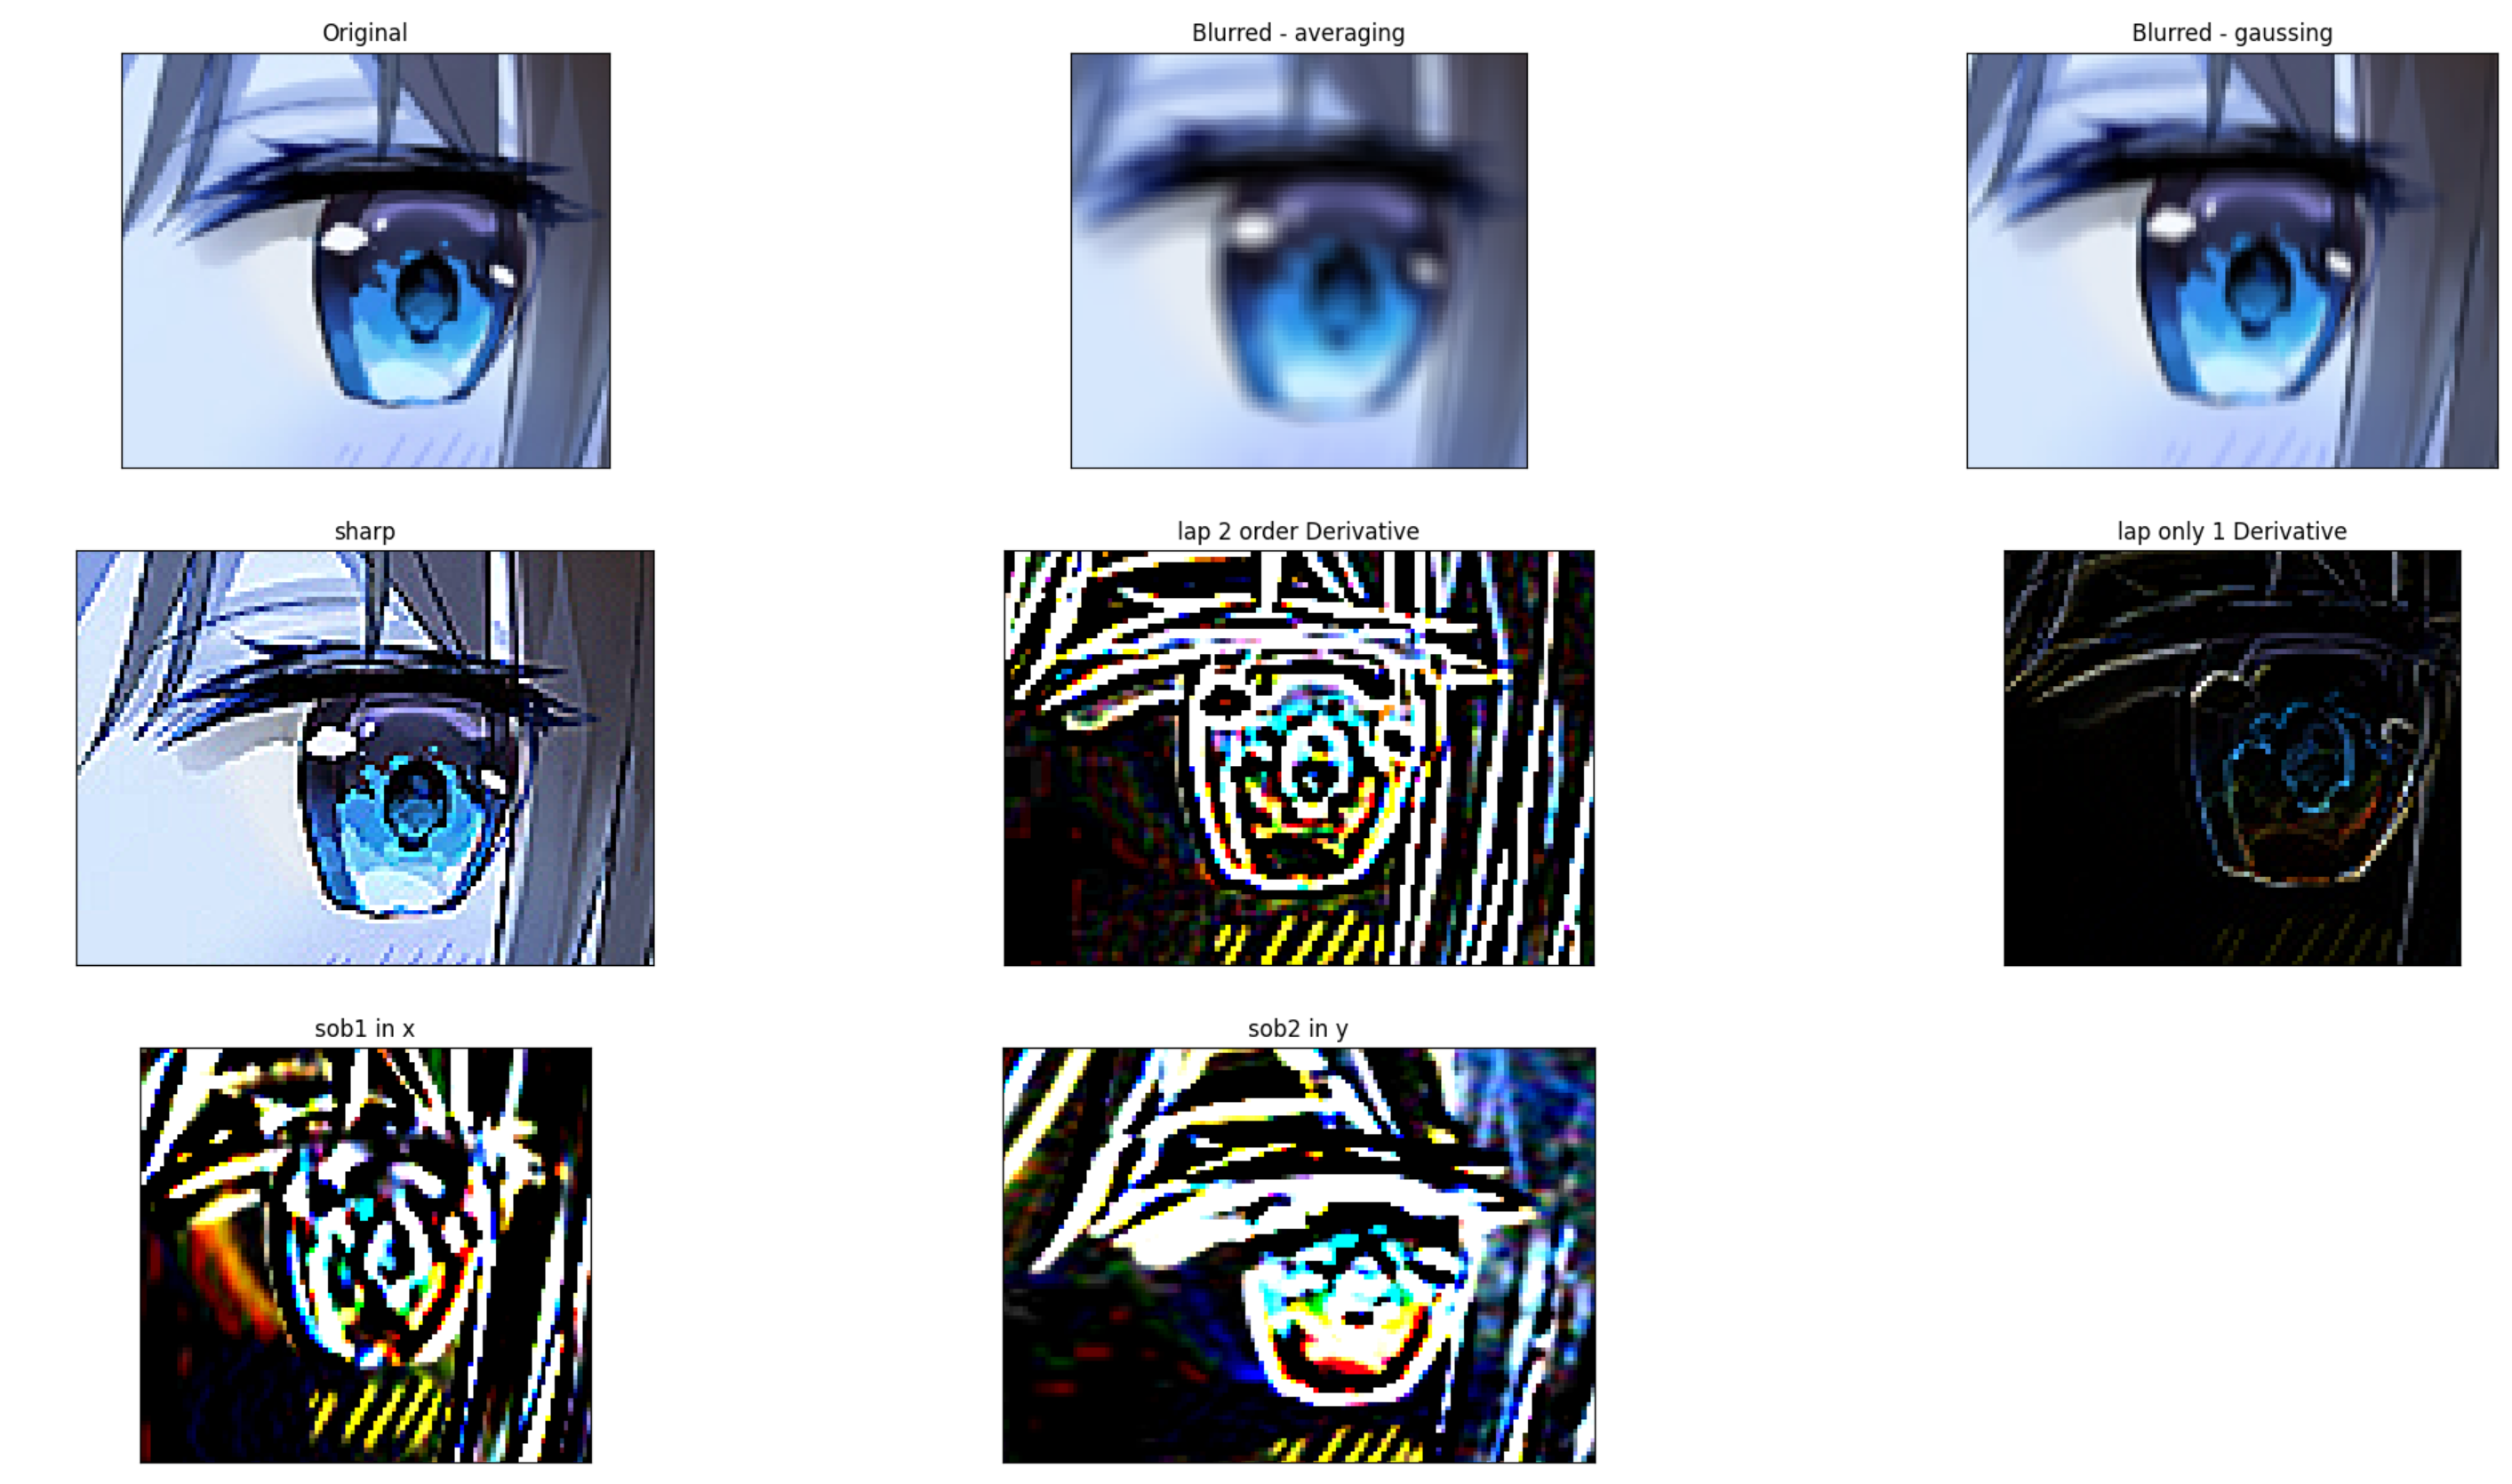
滤波与锐化结果对比

这里贴上代码(完整 Python 文件):

1
2
3
4
5
6
7
8
9
10
11
12
13
14
15
16
17
18
19
20
21
22
23
24
25
26
27
28
29
30
31
32
33
34
35
36
37
38
39
40
41
42
43
44
45
46
47
48
49
50
51
52
53
54
55
import cv2 as cv
import numpy as np
from matplotlib import pyplot as plt
img = cv.imread('F:/myFiles/blogs/source/_posts/imageFiltering/index3.png')

# averaging blur
avKer = np.ones((5,5), np.float32) / 25
blur = cv.filter2D(img, -1, avKer)

# gaussian blur
# do the convolution manually
gKernel = cv.getGaussianKernel(3, 2)
print(gKernel[0:2])
blur2 = cv.filter2D(img, -1, gKernel)
# blur2 = cv.GaussianBlur(img, (5,5), 0)

# sharpenning
sharpKer = np.zeros((3,3), np.float32)
sharpKer[0] = [0, -1, 0]
sharpKer[1] = [-1, 5, -1]
sharpKer[2] = [0, -1, 0]
print(sharpKer)
sharp1 = cv.filter2D(img, -1, sharpKer)

# only using 1 derivative to get the edge:
oneDKer = np.zeros((3,3), np.float32)
oneDKer[0] = [0, 0, 0]
oneDKer[1] = [0, -2, 1]
oneDKer[2] = [0, 1, 0]
sharp2 = cv.filter2D(img, -1, oneDKer)

# laplacian
lap1 = cv.Laplacian(img, -1, None, 5)

# sobel
sob1 = cv.Sobel(img, -1, 1, 0, None, 5)
sob2 = cv.Sobel(img, -1, 0, 1, None, 5)

plt.subplot(331),plt.imshow(img),plt.title('Original')
plt.xticks([]), plt.yticks([])
plt.subplot(332),plt.imshow(blur),plt.title('Blurred - averaging')
plt.xticks([]), plt.yticks([])
plt.subplot(333),plt.imshow(blur2),plt.title('Blurred - gaussing')
plt.xticks([]), plt.yticks([])
plt.subplot(334),plt.imshow(sharp1),plt.title('sharp')
plt.xticks([]), plt.yticks([])
plt.subplot(335),plt.imshow(lap1),plt.title('lap 2 order Derivative')
plt.xticks([]), plt.yticks([])
plt.subplot(336),plt.imshow(sharp2),plt.title('lap only 1 Derivative')
plt.xticks([]), plt.yticks([])
plt.subplot(337),plt.imshow(sob1),plt.title('sob1 in x')
plt.xticks([]), plt.yticks([])
plt.subplot(338),plt.imshow(sob2),plt.title('sob2 in y')
plt.xticks([]), plt.yticks([])
plt.show()

Ref

1 github初始化仓库

初始化git repo: 地址如下
https://github.com/xychen5/xychen5.github.io.git

2 安装相关依赖

1
2
3
4
5
6
npm install -g hexo
hexo init blogs
cd blogs
npm install -s hexo-theme-next # 安装主题
npm install --save hexo-deployer-git # 安装专用git工具
hexo s # 本地测试一下是否能正常运行

3 部署

编辑blogs/_config.yml的末尾如下:

1
2
3
4
5
6
7
8
9
10
11
12
13
14
15
16
17
# Extensions
## Plugins: https://hexo.io/plugins/
## Themes: https://hexo.io/themes/
theme: next

# Deployment
## Docs: https://hexo.io/docs/one-command-deployment
deploy:
type: git
repo: git@github.com:xychen5/xychen5.github.io.git
branch: main

# MathJax
math:
engine: 'mathjax'
mathjax:
src: https://cdnjs.cloudflare.com/ajax/libs/mathjax/2.7.4/MathJax.js?config=TeX-MML-AM_CHTML

部署如下:

1
2
hexo clean && hexo g -d
cp .\node_modules\hexo-theme-next\_config.yml ./_config.next.yml # 将next的配置放到项目根目录,避免编辑第三方库里的yml

4 博客写作分类以及标签以及使用技巧

5 将hexo生成的网站(会推到xychen5.github.io库里)和自己写的markdown文件分开

  • 1 主要是将blogs/source目录下的文件用另一个库存好即可,可以使用如下步骤:
    1
    2
    3
    4
    5
    6
    cd source
    git init
    git remote add origin <你的空repo地址>
    git add .
    git commit -m 'init'
    git push -u origin master
  • 2 然后在blogs/package.json加入:
    1
    2
    3
    4
    5
    6
    7
    "scripts": {
    "build": "hexo generate",
    "clean": "hexo clean",
    "deploy": "hexo deploy",
    "server": "hexo server",
    "pub": "cd source && git add ./* && git commit -m 'upate' && git push && cd .. && hexo clean && hexo g -d"
    },

6 使用GitHub的图片床

主要参考:https://github.com/XPoet/picx
生成token后记得复制: https://github.com/settings/tokens

在cesium中实现HPR

主要参考例子:

https://sandcastle.cesium.com/index.html?src=HeadingPitchRoll.html

上述例子中的第一人称视角处理有纰漏,改进后的效果和实现的代码如下:

1
2
3
4
5
6
7
8
9
10
11
12
13
14
15
16
17
18
19
20
21
22
23
24
25
26
27
28
29
30
31
32
33
34
35
36
37
38
39
40
41
42
43
44
45
46
47
48
49
50
51
52
53
54
55
56
57
58
59
60
61
62
63
64
65
66
67
68
69
70
71
72
73
74
75
76
77
78
79
80
81
82
83
84
85
86
87
88
89
90
91
92
93
94
95
96
97
98
99
100
101
102
103
104
105
106
107
108
109
110
111
112
113
114
115
116
117
118
119
120
121
122
123
124
125
126
127
128
129
130
131
132
133
134
135
136
137
138
139
140
141
142
143
144
145
146
147
148
149
150
151
152
153
154
155
156
157
158
159
160
161
162
163
164
165
166
167
168
169
170
171
172
173
174
175
176
177
178
179
180
181
182
183
184
185
186
187
188
189
190
191
192
193
194
195
196
197
198
199
200
201
202
203
204
205
206
207
208
209
210
211
212
213
214
215
216
217
218
219
220
221
222
223
224
225
226
227
228
229
230
231
232
233
234
235
236
237
238
        let canvas = viewer.canvas;
canvas.setAttribute("tabindex", "0"); // needed to put focus on the canvas
canvas.addEventListener("click", function () {
canvas.focus();
});
canvas.focus();

let scene = viewer.scene;

let pathPosition = new SampledPositionProperty();
this.planePath = viewer.entities.add({
id: "keyboardDemoPlanePath",
position: pathPosition,
// name: "path",
path: {
show: true,
leadTime: 0,
trailTime: 60,
width: 10,
resolution: 1,
material: new PolylineGlowMaterialProperty({
glowPower: 0.3,
taperPower: 0.3,
color: Color.PALEGOLDENROD
})
}
});

let camera = viewer.camera;
let controller = scene.screenSpaceCameraController;
let r = 0;
let center = new Cartesian3();

let hpRoll = new HeadingPitchRoll();
let hpRange = new HeadingPitchRange();
let speed = 1;
let deltaRadians = _Math.toRadians(3.0);

let position = Cartesian3.fromDegrees(
114.4152843,
30.512368,
5000.0
);
let speedVector = new Cartesian3();
let fixedFrameTransform = Transforms.localFrameToFixedFrameGenerator(
"north",
"west"
);

let planePrimitive = scene.primitives.add(
Model.fromGltf({
url: `${webSetting.assetsUrl}/map/su30.gltf`,
// url: `${webSetting.assetsUrl}/map/apaqi_x-90_y180.glb`,
modelMatrix: Transforms.headingPitchRollToFixedFrame(
position,
hpRoll,
Ellipsoid.WGS84,
fixedFrameTransform
),
minimumPixelSize: 256
})
);
this.plane = planePrimitive;

planePrimitive.readyPromise.then(function (model) {
// Play and loop all animations at half-speed
model.activeAnimations.addAll({
multiplier: 0.5,
loop: ModelAnimationLoop.REPEAT
});

// Zoom to model
r = 2.0 * Math.max(model.boundingSphere.radius, camera.frustum.near);
controller.minimumZoomDistance = r * 0.5;
Matrix4.multiplyByPoint(
model.modelMatrix,
model.boundingSphere.center,
center
);
let heading = _Math.toRadians(230.0);
let pitch = _Math.toRadians(-20.0);
hpRange.heading = heading;
hpRange.pitch = pitch;
hpRange.range = r * 50.0;
camera.lookAt(center, hpRange);
});

this.keyBoardListener = function (e) {
switch (e.keyCode) {
case 40:
if (e.shiftKey) {
// speed down
speed -= 10;
speed = Math.max(speed, 1);
} else {
// pitch down
hpRoll.pitch -= deltaRadians;
if (hpRoll.pitch < -_Math.TWO_PI) {
hpRoll.pitch += _Math.TWO_PI;
}
}
break;
case 38:
if (e.shiftKey) {
// speed up
speed += 10;
speed = Math.min(speed, 1000);
} else {
// pitch up
hpRoll.pitch += deltaRadians;
if (hpRoll.pitch > _Math.TWO_PI) {
hpRoll.pitch -= _Math.TWO_PI;
}
}
break;
case 39:
if (e.shiftKey) {
// roll right
hpRoll.roll += deltaRadians;
if (hpRoll.roll > _Math.TWO_PI) {
hpRoll.roll -= _Math.TWO_PI;
}
} else {
// turn right
hpRoll.heading += deltaRadians;
if (hpRoll.heading > _Math.TWO_PI) {
hpRoll.heading -= _Math.TWO_PI;
}
}
break;
case 37:
if (e.shiftKey) {
// roll left until
hpRoll.roll -= deltaRadians;
if (hpRoll.roll < 0.0) {
hpRoll.roll += _Math.TWO_PI;
}
} else {
// turn left
hpRoll.heading -= deltaRadians;
if (hpRoll.heading < 0.0) {
hpRoll.heading += _Math.TWO_PI;
}
}
break;
default:
break;
}
};
document.addEventListener("keydown", this.keyBoardListener);

let headingSpan = document.getElementById("heading");
let pitchSpan = document.getElementById("pitch");
let rollSpan = document.getElementById("roll");
let speedSpan = document.getElementById("speed");
let fromBehind = document.getElementById("fromBehind");

this.preUpateSpeedViewFunc = (scene, time) => {
speedVector = Cartesian3.multiplyByScalar(
Cartesian3.UNIT_X,
speed / 10,
speedVector
);

// let lastPosition = position.clone();
position = Matrix4.multiplyByPoint(
planePrimitive.modelMatrix,
speedVector,
position
);
this.center = position;


// pathPosition.addSample(JulianDate.now(), position);
pathPosition.addSample(time, position);
// console.log("adding: t->p: ", JulianDate.now().toString(), " -> ",position.toString());
Transforms.headingPitchRollToFixedFrame(
position,
hpRoll,
Ellipsoid.WGS84,
fixedFrameTransform,
planePrimitive.modelMatrix
);

// view at fisrt player
if (this.fpsFlag) {
// Zoom to model
Matrix4.multiplyByPoint(
planePrimitive.modelMatrix,
planePrimitive.boundingSphere.center,
center
);

hpRange.heading = hpRoll.heading;
hpRange.pitch = hpRoll.pitch;
hpRange.range = camera.frustum.near * 0.05;
// mainly using this to set the camera position relatively to the plane
camera.lookAt(center, hpRange);
camera.moveForward(8.2);
camera.moveLeft(2.65);
camera.moveUp(0.7);
// console.log("cur camera hpr is: ",camera.heading, " ", camera.pitch, " ", camera.roll,
// "hpRoll's hpr is ", hpRoll.heading, " ", hpRoll.pitch, " ", hpRoll.roll, " ");

// set the hpr according to the hpr of the plane
camera.setView({
orientation: {
heading : hpRoll.heading, // east, default value is 0.0 (north)
pitch : hpRoll.pitch, // default value (looking down)
roll : hpRoll.roll // default value
}
});
}
};
viewer.scene.preUpdate.addEventListener(this.preUpateSpeedViewFunc, this);

this.preUpateHPRFunc = (scene, time) => {
this.headingShow = _Math.toDegrees(hpRoll.heading).toFixed(2);

this.pitchShow = _Math.toDegrees(hpRoll.pitch).toFixed(2);
this.rollShow = _Math.toDegrees(hpRoll.roll).toFixed(2);
this.speedShow = speed.toFixed(2);

let tmp = Cartographic.fromCartesian(this.center, Ellipsoid.WGS84);
this.planeLon = tmp.longitude.toFixed(2);
this.planeLat = tmp.latitude.toFixed(2);
this.planeHei = tmp.height.toFixed(2);

// headingSpan.innerHTML = _Math.toDegrees(hpRoll.heading).toFixed(
// 1
// );
// pitchSpan.innerHTML = _Math.toDegrees(hpRoll.pitch).toFixed(1);
// rollSpan.innerHTML = _Math.toDegrees(hpRoll.roll).toFixed(1);
// speedSpan.innerHTML = speed.toFixed(1);
};
viewer.scene.preRender.addEventListener(this.preUpateHPRFunc, this);
});
}

记野指针带来的堆错误

错误流程:

结构体里面有指针,
结构体的vector整个赋值给了别人,
然后自己的直接clear了,
然后vector的clear()会释放指针的内存,但是却不会将指针置空
再去访问时就出错

简单错误再现

1
2
3
4
5
6
7
8
9
10
11
12
13
14
15
16
17
18
19
20
21
22
23
24
25
26
27
28
29
30
31
32
33
34
35
36
37
38
39
#include <iostream>

class A {
public:
A() {
ptr = new char[3];
}

inline void Release() {
if (ptr != nullptr) {
// std::cout << "ptr is: " << ptr << std::endl;
delete ptr;
ptr = nullptr;
}
std::cout << "call des" << std::endl;
}

~A() {
Release();
}
char* ptr;

};


int main() {
A tmp = A();
A tmp2 = tmp; // 这里将数据传递给tmp2,tmp我们不需要了,但是不能执行tmp的释放,因为tmp里面的数据我们任然需要
// tmp.ptr = nullptr; // 取消这句的注释,可以解决该bug

tmp2.ptr[0] = '1';
tmp2.ptr[1] = '1';
tmp2.ptr[2] = '1';
tmp.Release();
return 0;
// in fact, when ready to exit the main, will automatically call the tmp2's destructor
}


Tips:

  • 1 如果你决定把一个对象以及它所指向的内存的所有权(读写,销毁的权利)交给另一个对象,赋值完以后务必立马将原来的对象置空,应当把这一过程看成是对原来的对象的delete操作;