1 强联通分量解释

SCC(stronglyConnectedComponents) 对于G(v, e)的一个子图中,其任何两个顶点都存在一个path相互到达;

2 图的拓扑排序

拓扑排序的核心思路还是利用深度优先搜索,排序的基本思想为深度优先搜索正好只会访问每个顶点一次,如果将dfs的参数顶点保存在一个数据结构中,遍历这个数据结构就能访问图中的所有顶点,而遍历的顺序取决于这个数据结构的性质以及是在递归调用之前还是递归调用之后保存。

  • 1 前序: 在递归调用之前将顶点加入队列 —- pre()方法
  • 2 后序: 在递归调用之后将顶点加入队列 —- post()方法
  • 3 逆后序: 在递归调用之后将顶点压入栈 —- reversePost()方法
    这里给出一个逆后序的例子:
    https://cdn.jsdelivr.net/gh/xychen5/blogImgs@main/imgs/强联通分量.77kjmz93ddc0.png
    其逆后序得到的一个栈为:(右侧为栈顶,代表最晚完成访问的节点) 6 4 2 5 3 1

逆后序获得代码:

1
2
3
4
5
6
7
8
9
10
11
12
13
14
15
16
17
18
19
20
21
22
23
24
25
26
27
28
29
30
31
32
33
34
35
36
37
38
39
40
41

public class DepthFirstOrder {
private boolean[] marked;
private Queue<Integer> pre; //所有顶点的前序排列
private Queue<Integer> post; //所有顶点的后序排列
private Stack<Integer> reversePost; //所有顶点的逆后序排列

public DepthFirstOrder(Digraph G){
pre = new Queue<Integer>();
post = new Queue<Integer>();
reversePost = new Stack<Integer>();
marked = new boolean[G.V()];

for(int v =0;v<G.V();v++)
if(!marked[v]) dfs(G,v);
}
private void dfs(Digraph G,int v){
pre.enqueue(v);

marked[v] = true;
for(int w:G.adj(v))
if(!marked[w])
dfs(G,w);

post.enqueue(v);
reversePost.push(v);
}

public Iterable<Integer> pre(){
return pre;
}

public Iterable<Integer> post(){
return post;
}

public Iterable<Integer> reversePost(){
return reversePost;
}

}

3 求解算法

3.1 kosaraju算法

https://en.wikipedia.org/wiki/Kosaraju%27s_algorithm 伪代码:

  1. For each vertex u of the graph, mark u as unvisited. Let L be empty.
  2. For each vertex u of the graph do Visit(u), where Visit(u) is the recursive subroutine:
    If u is unvisited then:
    1. Mark u as visited.
    2. For each out-neighbour v of u, do Visit(v).
    3. Prepend u to L.
    Otherwise do nothing.
  3. For each element u of L in order, do Assign(u,u) where Assign(u,root) is the recursive subroutine:
    If u has not been assigned to a component then:
    1. Assign u as belonging to the component whose root is root.
    2. For each in-neighbour v of u, do Assign(v,root).
    Otherwise do nothing.

换句话说:
主要就是2次dfs:

  • 1 获得G的逆图G’,对G做一遍dfs获得其逆后序的顶点访问序列
  • 2 对于逆后序顶点访问序列,重复2.1即可
    • 2.1 将最晚完成访问的顶点,在G’中访问,能够一遍到达的那些顶点,就是目标的连通分量,将相关顶点在逆后序访问序列中移除即可

3.2 Tarjan算法(待续)

参考: https://www.cnblogs.com/wuchanming/p/4138705.html

3.3 Gabow算法(待续)

参考: https://www.cnblogs.com/wuchanming/p/4138705.html

具体的例子:

4 实际题解

4.1 针对无向图连通分量求解

该解题方案实际上为有向图强联通分量求解的一个子集,无向图即为顶点和顶点之间的边均为双向边。
这里以kosaraju算法为例:

  • 1 对于有向图,一开始我们需要获取dfs的逆序遍历栈,原因是,在第二次dfs也就是逆图中的遍历我们可以总是用最晚完成遍历的点去遍历,如此依赖,这样的一个遍历就能得到一个连通分量。
  • 2 但是针对无向图,不需要这样,因为遍历到不能拓展新的节点,我们就获取到了一个连通分量。

https://leetcode-cn.com/problems/number-of-provinces/
其解法如下:

1
2
3
4
5
6
7
8
9
10
11
12
13
14
15
16
17
18
19
20
21
22
23
24
25
26
27
28
29
30
31
32
33
34
35
36
37
38
39
40
41
42
43
44
45
46
47
48
49
50
51
52
53
54
55
56
57
58
59
60
61
62
63
64
65
66
67
68
69
70
71
72
class Solution {
public:
void dfs(vector<vector<int>>& g, vector<int>& reversePost, vector<bool>& vis, int tarV) {
vis[tarV] = true;
for(int j = 0; j < g.size(); ++j) {
if(g[tarV][j] != 0) {
if(!vis[j]) {
dfs(g, reversePost, vis, j);
}
}
}
reversePost.emplace_back(tarV);
}

int findCircleNum(vector<vector<int>>& isConnected) {
// 获取逆图
int n = isConnected.size();
vector<vector<int>> revIsConnected(isConnected);

// 由于不是针对有向图,故不需要这一步
// 获取逆序
vector<bool> vis(n, false);
vector<int> reversePost;
// dfs(isConnected, reversePost, vis, 0);

// 直接任选一点遍历,看有几个连通分量即可
int ans = 0;
for(int j = 0; j < isConnected.size(); ++j) {
if(!vis[j]) {
dfs(isConnected, reversePost, vis, j);
ans ++;
}
}
return ans;
}
};

// 顺便给一个并查集解法:
class Solution {
public int findCircleNum(int[][] isConnected) {
int provinces = isConnected.length;
int[] parent = new int[provinces];
for (int i = 0; i < provinces; i++) {
parent[i] = i;
}
for (int i = 0; i < provinces; i++) {
for (int j = i + 1; j < provinces; j++) {
if (isConnected[i][j] == 1) {
union(parent, i, j);
}
}
}
int circles = 0;
for (int i = 0; i < provinces; i++) {
if (parent[i] == i) {
circles++;
}
}
return circles;
}

public void union(int[] parent, int index1, int index2) {
parent[find(parent, index1)] = find(parent, index2);
}

public int find(int[] parent, int index) {
if (parent[index] != index) {
parent[index] = find(parent, parent[index]);
}
return parent[index];
}
}

4.2 针对有向图连通分量的求解

参考例子

1 购买云主机

购买地址:(选择centos即可)
https://www.vultr.com/register/
建议: 选择硅谷服务器,ip比较好用
购买后deploy完成(大胆deploy,一次0.01$,它收费是按照使用时长收费的)

2 ssh登入主机然后安装ss服务端

2.0 安装ss-server, 以及obfs或者v2ray作为混淆

1
2
3
4
5
6
7
8
9
10
11
12
13
14
15
16
17
18
19
20
21
22
23
24
25
26
27
28
29
30
31
32
33
34
35
36
37
38
39
40
41
42
43
# 关闭防火墙
systemctl status firewalld.service
systemctl stop firewalld.service
systemctl disable firewalld.service

# 安装ss-server
## mac: brew install shadowsocks-libevs

cd /etc/yum.repos.d/
yum install -y https://dl.fedoraproject.org/pub/epel/epel-release-latest-7.noarch.rpm
curl -O https://copr.fedorainfracloud.org/coprs/librehat/shadowsocks/repo/epel-7/librehat-shadowsocks-epel-7.repo
yum install -y shadowsocks-libev
ss-server -h # 之后应该能看到提示信息

# 安装simple-obfs(已经不再维护)
yum install zlib-devel openssl-devel git autoconf automake asciidoc libtool xmlto libev-devel -y
git clone https://github.com/shadowsocks/simple-obfs.git
cd simple-obfs
git submodule update --init --recursive
./autogen.sh
./configure && make
make install
cd .. && obfs-server # 应该能看到提示信息

# 安装v2ray-plugin
# v2ray需要域名支持,所以重新考虑吧


### 2.1 配置ss-server的配置文件:
```sh
[root@vultrguest simple-obfs]# cat /etc/shadowsocks-libev/config.json
{
"server":["[::0]","0.0.0.0"],
"server_port": 8388,
"password":"0000",
"timeout":300,
"plugin": "obfs-server",
"plugin_opts": "obfs=tls;obfs-host=iosapps.itunes.apple.com",
"method":"aes-256-gcm",
"fast_open":false
}

2.2 将ss-server启动配置成服务

1
2
3
4
5
6
7
8
9
10
11
# 创建文件: /etc/systemd/system/shadowsocks.service,其内容如下
[Unit]
Description=Shadowsocks Server
After=network.target

[Service]
ExecStart=/usr/bin/ss-server -c /etc/shadowsocks-libev/config.json -u
Restart=on-abort

[Install]
WantedBy=multi-user.target

之后启动服务:

1
2
3
systemctl enable shadowsocks.service
systemctl start shadowsocks.service
systemctl status shadowsocks.service

应该能看到如下结果:

1
2
3
4
5
6
7
8
9
10
11
12
13
14
15
[root@nash5 ~]# systemctl status shadowsocks.service
● shadowsocks.service - LSB: Fast tunnel proxy that helps you bypass firewalls
Loaded: loaded (/etc/rc.d/init.d/shadowsocks; generated)
Active: active (running) since Mon 2021-09-27 01:53:36 UTC; 1 weeks 4 days ago
Docs: man:systemd-sysv-generator(8)
Process: 61718 ExecStop=/etc/rc.d/init.d/shadowsocks stop (code=exited, status=0/SUCCESS)
Process: 61720 ExecStart=/etc/rc.d/init.d/shadowsocks start (code=exited, status=0/SUCCESS)
Tasks: 2 (limit: 5048)
Memory: 19.0M
CGroup: /system.slice/shadowsocks.service
├─61722 /usr/local/bin/ss-server -v -c /etc/shadowsocks-libev/config.json -f /var/run/shadowsocks-libev.pid
└─61723 obfs-server

Oct 08 05:43:26 nash5 /usr/local/bin/ss-server[61722]: close a connection to remote, 4 opened remote connections
Oct 08 05:43:26 nash5 /usr/local/bin/ss-server[61722]: close a connection from client, 4 opened client connections

3 win 客户端方面

3.1 修改主机host

3.3 - end -

来了

4 linux&mac客户端

4.0.0 linux 安装simple-obfs(已经不再维护)

yum install zlib-devel openssl-devel git autoconf automake asciidoc libtool xmlto libev-devel -y
git clone https://github.com/shadowsocks/simple-obfs.git
cd simple-obfs
git submodule update –init –recursive
./autogen.sh
./configure && make
make install
cd .. && obfs-server # 应该能看到提示信息

linux将ss-local做成服务:

1
2
3
4
5
6
7
8
9
10
11
12
13
~ >>> cat /usr/lib/systemd/system/ss-local.service                                                                                              [130]
[Unit]
Description=Shadowsocks-Libev Client Service
After=network.target

[Service]
Type=simple
User=nobody
CapabilityBoundingSet=CAP_NET_BIND_SERVICE
ExecStart=/usr/local/bin/ss-local -c /etc/shadowsocks/ld.json --plugin obfs-local --plugin-opts "obfs=tls;obfs-host=cn.bing.com;fast-open=true;"

[Install]
WantedBy=multi-user.target

编译过程不需要了,直接

1
2
3
4
5
6
brew install simple-obfs
brew install shadowsocks-libev

# 参照linux的写法:
/opt/homebrew/opt/shadowsocks-libev里的将plist文件改为:

1
2
3
4
5
6
7
8
9
10
11
12
13
14
15
16
17
18
19
20
21
22
<?xml version="1.0" encoding="UTF-8"?>
<!DOCTYPE plist PUBLIC "-//Apple//DTD PLIST 1.0//EN" "http://www.apple.com/DTDs/PropertyList-1.0.dtd">
<plist version="1.0">
<dict>
<key>KeepAlive</key>
<true/>
<key>Label</key>
<string>homebrew.mxcl.shadowsocks-libev</string>
<key>ProgramArguments</key>
<array>
<string>/opt/homebrew/opt/shadowsocks-libev/bin/ss-local</string>
<string>-c</string>
<string>/opt/homebrew/etc/shadowsocks-libev.json</string>
<string>plugin</string>
<string>obfs-local</string>
<string>plugin-opts</string>
<string>obfs=tls;obfs-host=cn.bing.com;fast-open=true;</string>
</array>
<key>RunAtLoad</key>
<true/>
</dict>
</plist>

可以看出对应的config文件,修改为如下:
其中的method一定要和server的方法对齐

1
2
3
4
5
6
7
8
9
10
ldxy@ldxydeMacBook-Pro softwares % cat /opt/homebrew/etc/shadowsocks-libev.json
{
"server":"你的ip",
"server_port":8388,
"local_port":1080,
"password":"你的秘密",
"timeout":600,
"method":"aes-256-gcm"
}

修改完成以后启动运行调试即可:

1
2
3
4
5
6
7
8
9
10
11
12
13
14
15
16
17
18
19
20
21
22
23
brew services list
cat ~/Library/LaunchAgents/homebrew.mxcl.shadowsocks-libev.plist
brew services start shadowsocks-libev
ps -ef | grep ss-local
````

# V2ray配置安装
## 1 购买域名
参考:
[https://www.clloz.com/programming/assorted/2021/11/15/vps-2021/](https://www.clloz.com/programming/assorted/2021/11/15/vps-2021/)

## 2 配置v2ray
参考: [https://iyideng.vip/black-technology/cgfw/vmess-v2ray-server-building-and-using-tutorial.html](https://iyideng.vip/black-technology/cgfw/vmess-v2ray-server-building-and-using-tutorial.html)

值得注意的一点是,当你本地ping不通你的域名,你需要修改dns服务器,使得你能够获得你的域名:
```sh
sudo vim /etc/resolv.conf
# 添加以下内容
nameserver 202.114.0.131
nameserver 202.114.0.242
nameserver 114.114.114.114

nslookup 你的域名

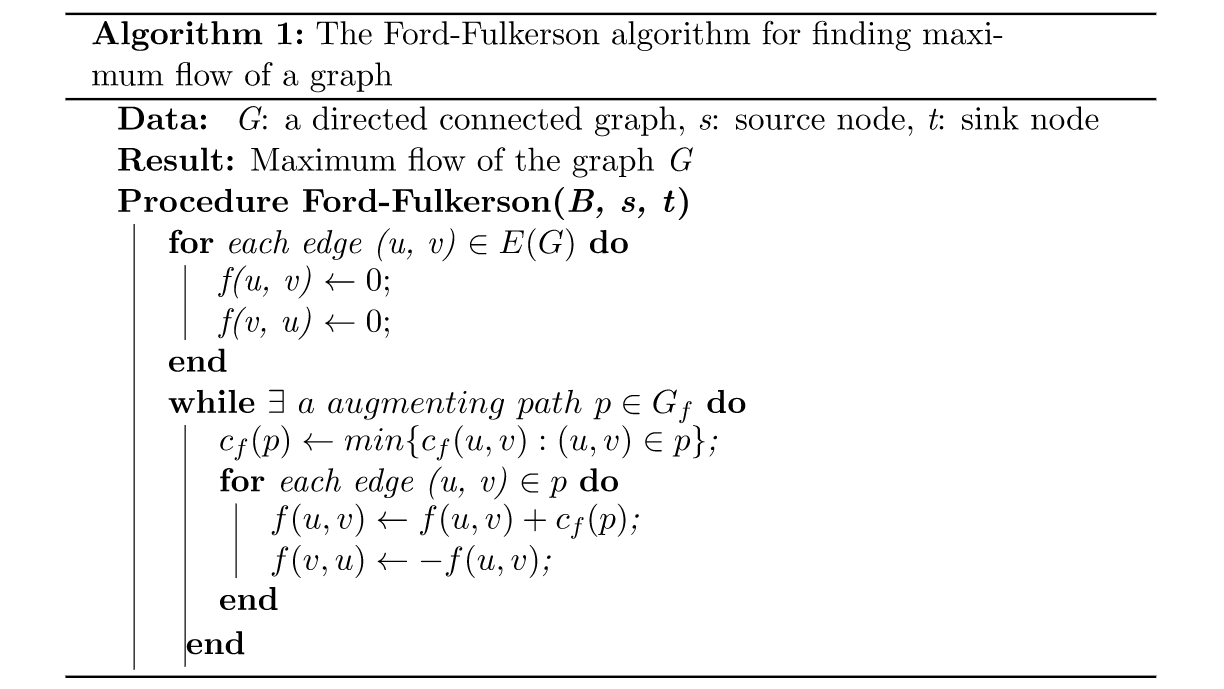
1 最大流-最小割本身含义

首先 起始点 s, 终止点 t, 从s->t的所有通路中,能够流过来的最大流量就是最大流,这里举个例子:
比如有如下的图:
1 -> 2 管道是5的容量,
2 -> 4 管道是4的容量,
1 -> 3 管道是3的容量,
3 -> 4 管道是6的容量,
那么从1->4的最大流,就是4 + 3 = 7

最小割:
最小割是指,从图中移除一些边的集合以达到隔断从s到t的目的,成为一个图割,然后最小割,就是所有图割中,边权(管道的流量)之和最小的一个图割,最小割的值和最大流的值是相等的

2 最大流最小割算法

MinCutMaximumFlowAlgorithm

其过程就是:

  • 1 对于G中的每一个顶点,先将f(u, v)和f(v, u)都置为0
  • 2 当存在从s->t的一条路径(这样的一条路径称之为增广路径):
    • 2.1 找出这个路径上的最小边权,称为tmpC
    • 2.2 对增广路径上的每一条边,都做: f(u, v) += tmpC, f(v, u) = -f(u, v)
  • 3 G中的更改过后的图,称之为残余图(residual graph)
    上面过程的tmpC之和就是最大流的值

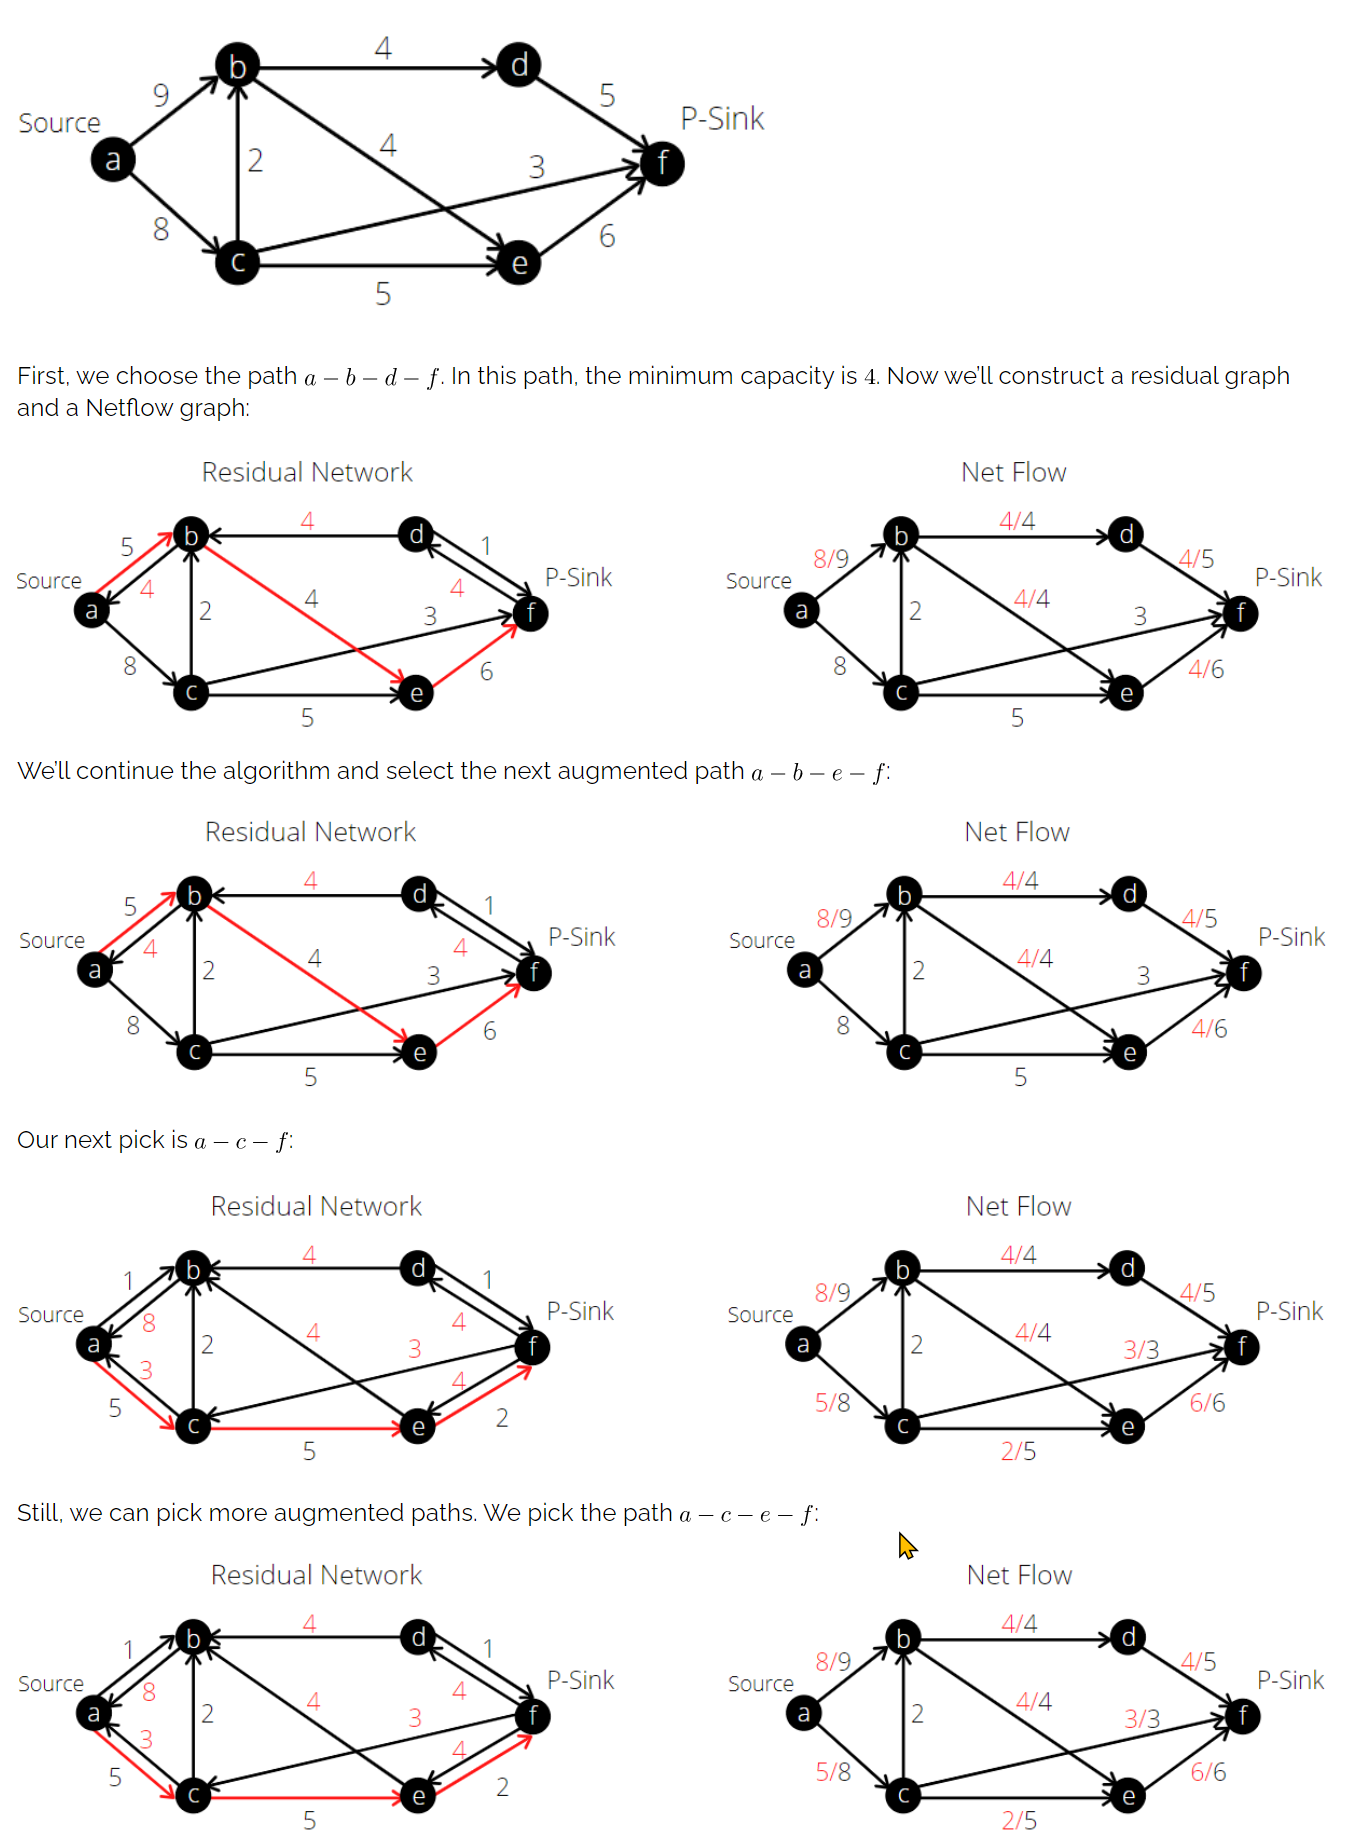
3 例子

引用自: https://www.baeldung.com/cs/minimum-cut-graphs
minCutEg

在上述例子里的残余图中:
可以看出: 最大流为: 4 + 4 + 3 + 2 = 13

4 最小割

在上述例子里的残余图中:
首先按照从s能够到达的点和不能到达的点分成2个集合set1(reaching by s)和set2(not reaching by s),这两个set在残余图中的连线构成的那些边成为最小割

那么set1是: (a, b, c, e)
set2是:(d, f)]
残余图中,set1和set2相关连的边为: b->d, c->f, e->f,最小割值为: 4 + 3 + 6 = 13

1 cesium/source/core/cartesian3.js 经纬度转WGS84坐标代码:

直接去github看cesium的源码实现就行了:

1
2
3
4
5
6
7
8
9
10
11
12
13
14
15
16
17
18
19
20
21
22
23
24
25
26
27
28
29
30
31
32
33
Cartesian3.fromRadians = function (
longitude,
latitude,
height,
ellipsoid, # default is WGS84
result
) {
//>>includeStart('debug', pragmas.debug);
Check.typeOf.number("longitude", longitude);
Check.typeOf.number("latitude", latitude);
//>>includeEnd('debug');

height = defaultValue(height, 0.0);
var radiiSquared = defined(ellipsoid)
? ellipsoid.radiiSquared
: wgs84RadiiSquared;

var cosLatitude = Math.cos(latitude);
scratchN.x = cosLatitude * Math.cos(longitude);
scratchN.y = cosLatitude * Math.sin(longitude);
scratchN.z = Math.sin(latitude);
scratchN = Cartesian3.normalize(scratchN, scratchN);

Cartesian3.multiplyComponents(radiiSquared, scratchN, scratchK);
var gamma = Math.sqrt(Cartesian3.dot(scratchN, scratchK));
scratchK = Cartesian3.divideByScalar(scratchK, gamma, scratchK);
scratchN = Cartesian3.multiplyByScalar(scratchN, height, scratchN);

if (!defined(result)) {
result = new Cartesian3();
}
return Cartesian3.add(scratchK, scratchN, result);
};

0 直接看实现

  • 1 手写依赖扫描版本
  • 2 spring boot 版本

    1 自定义注解 Annotation

    这里给出自定义注解的例子:
    1
    2
    3
    4
    5
    6
    7
    8
    9
    10
    11
    package com.soul.weapon.algorithm.annotation;

    import java.lang.annotation.*;

    @Target({ElementType.TYPE, ElementType.FIELD})
    @Retention(RetentionPolicy.RUNTIME)
    @Documented
    @Inherited
    public @interface WeaponAlgorithm {
    String algoName () default "";
    }

注意注解的申明是用@interface来声明的:
然后这里对每一个参数做简单说明:

  • @Target 说明注解的使用范围
    • TYPE: 用于描述类、接口(包括注解类型) 或enum声明
    • FILED: 用于描述域
  • @Retention 说明注解可以被保留到什么地方
    • 1 RetentionPolicy.SOURCE:注解只保留在源文件,当Java文件编译成class文件的时候,注解被遗弃;
    • 2 RetentionPolicy.CLASS:注解被保留到class文件,但jvm加载class文件时候被遗弃,这是默认的生命周期;
    • 3 RetentionPolicy.RUNTIME:注解不仅被保存到class文件中,jvm加载class文件之后,仍然存在;

      这3个生命周期分别对应于:Java源文件(.java文件) —> .class文件 —> 内存中的字节码。
      明确生命周期长度 SOURCE < CLASS < RUNTIME ,所以前者能作用的地方后者一定也能作用。一般如果需要在运行时去动态获取注解信息,那只能用 RUNTIME 注解,比如接下来要讲到的在运行过程过获得某种注解的所有的类;如果要在编译时进行一些预处理操作,比如生成一些辅助代码(如 ButterKnife 和 mapstruct 等),就用 CLASS注解;如果只是做一些检查性的操作,比如** @Override**和 @SuppressWarnings,则可选用 SOURCE 注解。

  • @Documentation: 用于生成javadoc
  • @Inherited: 说明被改注解注释的子类会继承该注解

2 简单工厂模式 简单甚至不简单的工厂Ref

简单说明一下,比如你有一个业务要求是,实现n种车的drive方法,那最普通的就如下:
分别实现其类然后调用,这未免有点难看:

1
2
3
4
5
6
7
8
9
10
public class Driver1 {

public static void main(String[] args) {
Car1 car = new Car1();
Car2 car = new Car2();
Car3 car = new Car3();
Car4 car = new Car4();
}

}

使用简单工厂模式就是说,来一个carFactory类,我所有车的实例的创建和使用都通过carFactory,然后传具体的参数就能实例化相应的类:

1
2
3
4
5
6
7
8
9
10
11
12
13
14
15
16
17
18
19
20
21
public class Driver2 {
public Car car;
public static void createCar(String name) {
switch (name) {
case "car1":
car = new Car3();
break;
case "car2":
car = new Car3();
break;
case "car3":
car = new Car3();
break;
default:
car = null;
break;
}
LOG.info("Created car name is {}", name);
}
public drive() { car.drive();}
}

但是这里有一个问题,没有遵循开闭原则(开放扩展,关闭修改的原则),那么造成没有遵循的原因是什么?因为每一个实现的类的名称是我们手动写到代码里的,当这些相关的类的名称是我们通过代码可以获取的时候,我们就可以解决该问题了,于是我们使用注解

3 使用注解的反射来完善包含简单工厂模式的策略模式

  • 策略模式 将具体的算法封装到一个context类,context可以根据传入的参数自动调取相关的算法,简单工厂模式还是与之很像的
  • 解决了什么问题
    策略模式是一种定义一系列算法的方法,从概念上来看,所有这些算法完全的都是相同的工作,只是实现不同,用户通过context以相同的方式调用所有的算法,减少了各种算法实现类与使用类之间的耦合
  • 和工厂模式的区别
    • 1 工厂模式,主要是将对象的创建,和使用进行解耦,而策略模式,主要将策略的定义创建,和使用进行解耦,主要是他们针对的对象不同,一个主体是实体类,另一个是策略类,我个人感觉核心思想都是一样的

3.1 示例分析:

接着上面#1的注解,一个策略模式的例子如下(个人理解,欢迎交流)

  • 1 定义一个接口,这样所有的算法类的调用都按照这个接口调用即可:
    1
    2
    3
    4
    5
    6
    7
    8
    9
    public interface Algorithm {
    /**
    *
    * 使用指定的工厂里的函数来处理input
    * @param input
    * @return
    */
    String exAlgo(String input);
    }
  • 2 为这个接口实现一个算法:
    1
    2
    3
    4
    5
    6
    7
    8
    9
    10
    @WeaponAlgorithm(algoName = "airMissilePipeTest")
    public class AirMissilePipeTest implements Algorithm {

    @Override
    public String exAlgo(String input) {
    Logger LOG = LoggerFactory.getLogger(AirMissilePipeTest.class);
    LOG.info("airMissilePipeTest algo executing!");
    return input;
    }
    }
  • 3 从用户层面考虑,为用户实现一个上下文类,这个上下文类帮助用户实例化对应的算法类,然后调用相关的算法类:
    1
    2
    3
    4
    5
    6
    7
    8
    9
    10
    11
    12
    13
    14
    15
    16
    17
    18
    19
    20
    21
    22
    23
    24
    25
    26
    27
    28
    29
    30
    31
    32
    33
    34
    35
    36
    37
    38
    39
    40
    41
    42
    public class AlgoFactoryContext {
    private static final Logger LOG = LoggerFactory.getLogger(AlgoFactoryContext.class);
    private static Map<String, Class> allStrategies;

    static {
    Reflections reflections = new Reflections("com.soul.weapon.algorithm.impl",
    new SubTypesScanner(),
    new TypeAnnotationsScanner(),
    new FieldAnnotationsScanner());
    Set<Class<?>> annotatedClasses =
    reflections.getTypesAnnotatedWith(WeaponAlgorithm.class);
    allStrategies = new ConcurrentHashMap<String, Class>();
    for (Class<?> classObject : annotatedClasses) {
    WeaponAlgorithm annotatedAlgo = (WeaponAlgorithm) classObject
    .getAnnotation(WeaponAlgorithm.class);
    allStrategies.put(annotatedAlgo.algoName(), classObject);
    }
    allStrategies = Collections.unmodifiableMap(allStrategies);
    }

    private Algorithm algoExecutor;

    public AlgoFactoryContext (String requiredAlgoName){
    if(allStrategies.containsKey(requiredAlgoName)) {
    LOG.info("algo name is {}", requiredAlgoName);
    try {
    algoExecutor = (Algorithm) allStrategies.get(requiredAlgoName).getDeclaredConstructor().newInstance();
    } catch (NoSuchMethodException | InstantiationException
    | InvocationTargetException | IllegalAccessException ex) {
    LOG.error("Instantiate algo Failed: ", ex);
    }
    } else {
    LOG.error("algo with name: {} not exist!", requiredAlgoName);
    }
    }

    public void execAlgo(String dataString) {
    algoExecutor.exAlgo(dataString);
    }
    }


  • 4 调用示例:
    1
    2
    AlgoFactoryContext ctx = new AlgoFactoryContext("airMissilePipeTest");
    ctx.execAlgo("info to process!");

4 当使用spritboot的自动装配来简化以免手动写reflections

  • 1 定义一个接口,这样所有的算法类的调用都按照这个接口调用即可:
    1
    2
    3
    4
    5
    6
    7
    8
    9
    public interface Algorithm {
    /**
    *
    * 使用指定的工厂里的函数来处理input
    * @param input
    * @return
    */
    String exAlgo(String input);
    }
  • 2 为这个接口实现一个算法:
    1
    2
    3
    4
    5
    6
    7
    8
    9
    10
    @Service(value = "airMissilePipeTest")
    public class AirMissilePipeTest implements Algorithm {

    @Override
    public String exAlgo(String input) {
    Logger LOG = LoggerFactory.getLogger(AirMissilePipeTest.class);
    LOG.info("airMissilePipeTest algo executing!");
    return input;
    }
    }
  • 3 创建上下文类然后自动注入实现接口的那些类:
    1
    2
    3
    4
    5
    6
    7
    8
    9
    10
    11
    12
    13
    14
    15
    16
    17
    18
    19
    @Service
    public class AlgoFactoryContext {
    private static final Logger LOG = LoggerFactory.getLogger(AlgoFactoryContext.class);

    @Autowired(required = true)
    private Map<String, Algorithm> allStrategies;

    private Algorithm algoExecutor;

    public void execAlgo(String requiredAlgoName, String dataString) {
    if(allStrategies.containsKey(requiredAlgoName)) {
    LOG.info("algo name is {}", requiredAlgoName);
    algoExecutor = (Algorithm) allStrategies.get(requiredAlgoName);
    } else {
    LOG.error("algo with name: {} not exist!", requiredAlgoName);
    }
    algoExecutor.exAlgo(dataString);
    }
    }
  • 4 调用:这里需要注意,如果是单独new一个AlgoFactoryContext,并没有办法完成自动装配,猜测原因是,由于使用了sprintboot的autoWire,那么所有依赖都要保证有@component和@sevice/@resouce等去注解,这些注解保证了sprinboot会将这些依赖给管理起来,所以如果new,那么autoWire无法发挥作用
    1
    2
    3
    4
    5
    6
    7
    8
    9
    10
    11
    12
    13
    14
    15
    16
    17
    18
    19
    20
    21
    22
    @Slf4j
    @RestController
    @RequestMapping("/free/test")
    @RequiredArgsConstructor
    public class FreePipeTestController {

    @Autowired
    private AlgoFactoryContext ctx; // by autowire, so ctx will scan and get all
    // implement of the algorithm interface

    private final PipeTestService pipeTestService;

    @Api
    @GetMapping(value = "/{id}")
    public PipeTest getById(@PathVariable("id") String id)
    {
    // add test for the algo factory:
    ctx.execAlgo("airMissilePipeTest", "telegram from socket!");
    return pipeTestService.getById(id);
    }
    ...
    }

1 pmvs文章 Accurate, Dense, and Robust Multiview Stereopsis

1 提出 patch-based MVS algorithm

2 关键词理解

2.1 patch: 估计模型表面的一个tagent平面,更具体的: 3维的一个矩形,其中一边平行于相机拍的图片,范围是55或者77的一个矩形

2.2 Photometric Discrepancy Function 光学差异函数: 用来恢复光学差异小的那些patches

改过程假设照片中物体的lambertian光照环境,R(p)是reference image的意思

2-1

$$g(p) = \frac{1}{|V(p) / R(p)|} \sum_{I \in V(p) \ R(p)}^{} h(p, I, R(p))$$

h(p, I, R(p))是光学差异函数,需要选择出那些满足低于阈值 α 的I然后组成V*(p):

2-2

$$V^*(p) = { I | I \in V(p), h(p, I, R(p))aa \leq \alpha) }$$

替换掉2-1中的V(p)即可,相当于对图像做了一个过滤,得到:

2-3

$$g^*(p) = \frac{1}{| V(p)^* / R(p)|} \sum_{I \in V^*(p) \ R(p)}^{} h(p, I, R(p))$$

2.3 patch优化

每一个patch重建需要2步

  • 1 初始化c(p), n(p), V*(p)以及R(p)
  • 2 优化c(p)和n(p), 将c(p)固定在一个ray上,这样就将自由度由3减少到1,然后n(p)由欧拉角来决定即可,yaw和pitch即可,那么就成为一个无约束最优化问题,则采用共轭梯度法(conjugate gradient)来解即可优化c(p)和n(p)

2.4 image

基于patch去做表面展示的最大优点是很灵活,然而缺少patch与patch之间的链接信息,就不容易获取相邻的patch,解决办法如下:
对于每一张图片,划分成 ββ(β=2在文中)的cell,然后对于每一个patch,它在每个可见图片上都有映射过去的cell,然后上述过程做完以后,每张图片的每个cell都记录了该cell可见的那些个patch,我们记作$Q_i(x, y)$, 同样的,如果是在每个可见图片而且满足#2-3定义的光学差异进行上述步骤,那么就得到$Q_i^(x, y)$

3 patch重建过程

3.1 初始化feature match

3.1.1 采用高斯查分和harris角点来做特征提取

3.1.2 特正匹配和生成atch

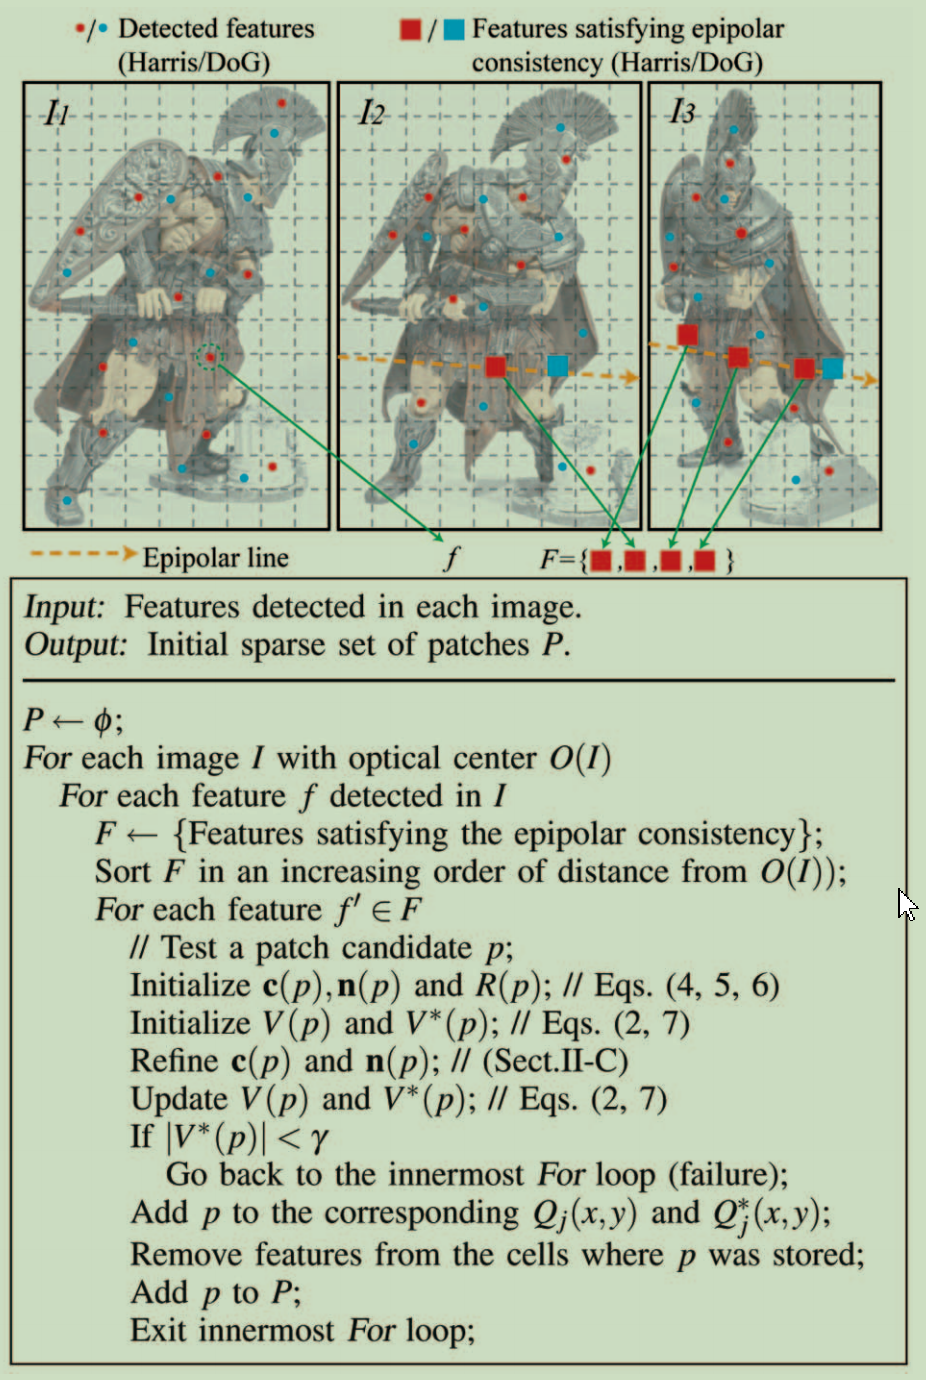
  • 1 对于图片$I_i$有光心$O(I_i)$,它里面的每个特征点f,在其它图片中有很多其他对应的特征点$f’$,对于每一个$(f, f’)$点对,那些在他们极线上的特征点,我们组成一个集合F,我们把F中的特征点三角化可以得到对应的3d点,对于这个点的集合,按照其与$O(I_i)$的距离升序排序,一个一个点的尝试去生成patch,生成patch在,直到成功
  • 2 生成patch的过程是在2.3 patch优化阐释的,这里简单复述一下,生成patch就是优化patch的c(p)和o(p)然后使得光学差异函数最小,一旦一个cell生成了一个patch,那么改cell的其他特征点就直接删除不需要了
    生成patch的算法如下:
    pmvs_feature_matching

    3.2 扩展patch

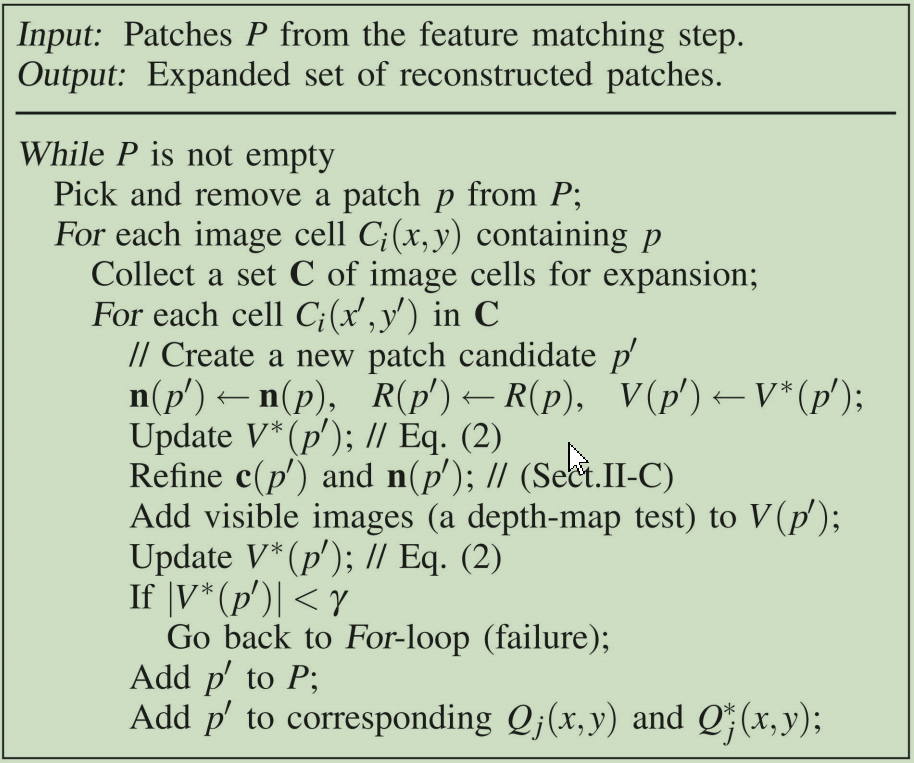
    目的: 对于每一个image的cell $C_i(x, y)$, 至少建出来一个patch,过程如下:

3.2.1 找出相邻的cells来扩展

pmvs_patch_expansion
对于一个p,其在它的第i张可见图片中,而且被$C_i(x, y)$格子记住的patch集合$Q_i(x, y)$中,然后相邻的cells如下获得:

3-1

$$C(p) = {C_i(x’, y’) | p in Q_i(x, y), |x - x’| + |y - y’| = 1}$$
C(p)中需要移除两种类型的cell

  • 1 移除已有patch的邻居cell,具体的: 若,$C_i(x’, y’)$ 包含了一个patch $p’$, 这个p’和p是邻居,那么这个$C_i(x’, y’)$则会被从C(p)移除,具体判断方式见下面的公式:

    3-2

    $$|(c(p) - c(p’))*n(p)| + |(c(p)-c(p’))*n(p’)| < 2\rho_1$$
    $\rho_1$是对应于参考图像R(p)在c(p)和c(p’)的深度时,图像移动$\beta_1$个pixels需要的距离
  • 2*(这一步可以不要,因为图片光学差异的图片过滤过程可以消除这个错误,主要是为了计算效率) 移除深度不连续的邻居cell,从已有的相机去看$C_i(x’, y’)$,得到的深度和从相机去看p的慎独过大,则放弃这种邻居cell,然而实际中构建surface之前,这些个p和$C_i(x’, y’)$可能真实对应的表面间的深度不连续很难判断,所以简单化,也就是若$Q_i^*(x’, y’)$的size大于0,也就证明不连续,也就是当这个$C_i(x’, y’)$这个格子,至少有一个patch是在满足了光学差异达到目标的情况下被他记录,那么它就不需要别的patch来帮他expand,我个人如此理解

3.3 滤除错误的patch

  • 1 过滤可见性不一致的patch,去除深度值不一致且一致性较低的点,意思是如果扩散的点云在其他图特征点的点云前面了,通过比较各自的一致性来剔除;如果扩散点云跑到后边去了,也比较一致性

    3-3

    $$|V^*(p)|(1-g^*(p)) < \sum_{p_i \in U(p)}{1-g^*(p)}$$
  • 2 对于每一个patch,用深度图计算出在$V^*(p)$中可以看到它的图像的个数,如果比$\gamma$要小,那么认为可见图片太少,滤除
  • 3 保证了一个弱正则化,对于每一个patch,收集它所有的可见图片的相邻cells中的所有patches,若这些patches中是邻居patch的比例小于0.25,那么也滤除(考虑到它的相邻patch都不是邻居说明这个patch空间上和邻居不太连续)

<未完待续>

0 相关脚本

1 docker cli 命令镜像管理

1.1 常见命令https://docs.docker.com/engine/reference/commandline/docker/

命令 说明
docker search myphp | grep admin 搜索镜像
docker pull mysql:latest
docker run –name myMysql -it -d -p 30000:3306 -e MYSQL_ROOT_PASSWORD=123456 mysql bash -it: 进入终端(tty), -p 端口映射: 本机到容器, -d后台运行
docker ps -al 查看镜像
docker rm -f 4e14 停止并完全删除镜像
docker logs -f –tail 50 myMysql 查看日志

1.2 cli示例

这里给一个运行mysql的例子:(gitbash中运行)

1
2
3
4
docker run -d \
--rm --name myMysql \
-e MYSQL_ROOT_PASSWORD=123456 \
-p 30000:3306 mysql --character-set-server=utf8mb4

2 docker yamlhttps://docs.docker.com/compose/gettingstarted/

2.1 这里给出redis和mysql的一个示例:

  • 1 mysql:
    1
    2
    3
    4
    5
    6
    7
    8
    9
    10
    11
    12
    13
    14
    15
    16
    17
    18
    19
    20
    21
    22
    23
    24
    25
    26
    27
    28
    29
    30
    31
    version: '3.7'
    services:
    mysql:
    image: mysql:8.0.18
    restart: always
    container_name: mysql
    ports:
    - "${MYSQL_PORT:-3306}:3306"
    networks:
    - ingress
    environment:
    - TZ=Asia/Shanghai
    - MYSQL_DATABASE=fregata
    - MYSQL_USER=xin
    - MYSQL_PASSWORD=123
    - MYSQL_ROOT_PASSWORD=${MYSQL_ROOT_PASSWORD:-123456}
    command:
    --default-authentication-plugin=mysql_native_password
    --character-set-server=utf8
    --collation-server=utf8_general_ci
    --explicit_defaults_for_timestamp=true
    --lower_case_table_names=1
    --max_connections=1000
    --max_allowed_packet=128M;
    volumes:
    - ./volumes/data:/var/lib/mysql
    - ./volumes/initdb.d:/docker-entrypoint-initdb.d:ro

    networks:
    ingress:
    name: xin
  • 2 reids:
    1
    2
    3
    4
    5
    6
    7
    8
    9
    10
    11
    12
    13
    14
    15
    16
    17
    18
    19
    20
    21
    22
    23
    version: "3.7"

    services:
    redis:
    image: redis:5.0.7
    build:
    context: ./build
    dockerfile: Dockerfile
    container_name: redis
    restart: always
    environment:
    - TZ=sia/Shanghai
    ports:
    - ${REDIS_PORT:-6379}:6379
    volumes:
    - ./volumes/data:/data
    networks:
    - ingress

    networks:
    ingress:
    external:
    name: xin
    起\挺\查看容器:
    1
    2
    3
    docker-compose up -d
    docker-compose down
    docker-compose ls

1 std::thread传入引用值需要使用std::ref

std::ref的说明: Constructs an object of the appropriate reference_wrapper type to hold a reference to elem.
其实主要是,如果要向thread传参的时候,该参数在线程内会被修改,需要用这个ref作为一个wrapper将对象包裹成为一个引用然后传入。

1
2
3
4
5
6
7
8
9
10
11
12
13
14
15
16
17
18
19
20
21
22
23
24
25
26
void main() {

while(1){
...<省略>...
if (!initializedFlag) {
initializedFlag = true;
// viewThd = new std::thread(viewThread, camVecToDraw); // wrong way
viewThd = new std::thread(viewThread, std::ref(camVecToDraw)); // right way
}
...<省略>...

addCamToDrawVec(imgData.image, camVecToDraw);
camVecToDraw;
}

viewThd.join();
delete viewThd;
viewThd = nullptr;
}

void viewThread(std::vector<pangolin::OpenGlMatrix>& camVecToDraw) {
while(!shallQuit()) {
// render some cameras according to camVecToDraw
...<省略>...
}
}

1 ffmpeg 解帧

1
ffmpeg -i DJI_20210615164633_0003_W.MP4 -r 3 images/%4d.jpg

2 reinterpret_cast<> 理解以及典型应用:

对于其他的例如static_cast<>等的应用,参考:http://www.cplusplus.com/doc/tutorial/typecasting/

以下引用自: https://stackoverflow.com/questions/573294/when-to-use-reinterpret-cast

Here is a variant of Avi Ginsburg’s program which clearly illustrates the property of reinterpret_cast mentioned by Chris Luengo, flodin, and cmdLP: that the compiler treats the pointed-to memory location as if it were an object of the new type:

1
2
3
4
5
6
7
8
9
10
11
12
13
14
15
16
17
18
19
20
21
22
23
24
25
26
27
28
29
30
31
32
33
34
35
36
37
38
39
40
41
42
43
44
#include <iostream>
#include <string>
#include <iomanip>
using namespace std;

class A
{
public:
int i;
};

class B : public A
{
public:
virtual void f() {}
};

int main()
{
string s;
B b;
b.i = 0;
A* as = static_cast<A*>(&b);
A* ar = reinterpret_cast<A*>(&b);
B* c = reinterpret_cast<B*>(ar);

cout << "as->i = " << hex << setfill('0') << as->i << "\n";
cout << "ar->i = " << ar->i << "\n";
cout << "b.i = " << b.i << "\n";
cout << "c->i = " << c->i << "\n";
cout << "\n";
cout << "&(as->i) = " << &(as->i) << "\n";
cout << "&(ar->i) = " << &(ar->i) << "\n";
cout << "&(b.i) = " << &(b.i) << "\n";
cout << "&(c->i) = " << &(c->i) << "\n";
cout << "\n";
cout << "&b = " << &b << "\n";
cout << "as = " << as << "\n";
cout << "ar = " << ar << "\n";
cout << "c = " << c << "\n";

cout << "Press ENTER to exit.\n";
getline(cin,s);
}

Which results in output like this:

1
2
3
4
5
6
7
8
9
10
11
12
13
14
15
as->i = 0
ar->i = 50ee64
b.i = 0
c->i = 0

&(as->i) = 00EFF978
&(ar->i) = 00EFF974
&(b.i) = 00EFF978
&(c->i) = 00EFF978

&b = 00EFF974
as = 00EFF978
ar = 00EFF974
c = 00EFF974
Press ENTER to exit.

It can be seen that the B object is built in memory as B-specific data first, followed by the embedded A object. The static_cast correctly returns the address of the embedded A object, and the pointer created by static_cast correctly gives the value of the data field. The pointer generated by reinterpret_cast treats b’s memory location as if it were a plain A object, and so when the pointer tries to get the data field it returns some B-specific data as if it were the contents of this field.

应用如下:
下面的应用根据输入的类型T判断后使用了reinterpret_cast去转换;

1
2
3
4
5
6
7
8
9
10
11
12
13
14
15
template <typename T>
void OptionManager::RegisterOption(const std::string& name, const T* option) {
if (std::is_same<T, bool>::value) {
options_bool_.emplace_back(name, reinterpret_cast<const bool*>(option));
} else if (std::is_same<T, int>::value) {
options_int_.emplace_back(name, reinterpret_cast<const int*>(option));
} else if (std::is_same<T, double>::value) {
options_double_.emplace_back(name, reinterpret_cast<const double*>(option));
} else if (std::is_same<T, std::string>::value) {
options_string_.emplace_back(name,
reinterpret_cast<const std::string*>(option));
} else {
LOG(FATAL) << "Unsupported option type";
}
}